Featured

Sunday 30 August 2015

Abstract Art with Tyvek

Hello Everyone,
 Shilpa here, 
I would like to share with you today, how we can create texture with Tyvek for mixed media abstract art work.
here comes my first piece with Tyvek...


Tyvek is a synthetic material consisting of Spun bound Olefin fiber. This material is very lightweight, strong, difficult to tear, but can be cut with Scissors/cutters. It is waterproof. 
It is mainly used for as Housewrap while construction, for making envelopes.
Priya has a stock of Tyvek in 12*12" size in her shop The Craft Shop


But we crafters have different use- 
As it is strong and durable - Used for Scrapbook binding.

and recently I found out its use in mixed media work...!


      so let's see how I created the texture on tyvek

    cut to a size that suits, Paint the Tyvek.

I've used different paints to try how it turns out.

We have to provide heat to this it can be done with Iron or Heat Tool. both gives almost same results.

Keep painted side down. Lay a sheet of baking paper/parchment paper/ protecting sheet over it and gently iron on high temp., actually you will have to hover the iron, and watch as the tyvek shrinks and shrivels and stop when your happy with the result. 

the above sheet turned out something like this which I painted with regular acrylic color.

 I've also experimented with other kinds of colors


Colour Arte Silks Acrylic glaze painted paper, turned out to be


 Alcohol ink splattered Tyvek, after heating turned out ...


Distress Stain- Fossilized Amber 


Color Arte Silk acrylic glaze - Honey Amber and Plum blossom

This had got lovely two tone effect.

Fevicryl Pearl Blue

I love this shiny piece with bubble texture.

So how to use it:

*These are fabulous backgrounds for cards.

* Can be used as embellishments.

* Great for any mixed media backgrounds.

I'll be going to do further experiments with Tyvek, do you?

  Thanks so much for stopping by.


Thursday 27 August 2015

Quilling Combing Technique using Double side Quilling comb : Quilled Bird

Hello girls! 

     This is Angela here from thecraftyangels. Im here today with a quilling tutorial that has been done with help of double sided quilling tool. Hope you guys enjoy this :)
P.S – This is a picture heavy post. Please enjoy reading through while they all load :)

This is a project I started working on along with quilled flower I made with double sided quilling comb (HERE). But somehow as I had very rightly anticipated, bigger projects are totally not my cup of tea and I have been dragging this so much that right now I have stopped everything else to just get done with this! I need to find a perfect frame for this quilled bird made using quilling combing technique but yeah well..maybe after a while :P! Thankyou Priya for giving me the push to create something different :) Yeah so for anyone who want to buy this double sided quilling comb that I have used for this quilled bird, HERE is the link to product.

Materials required to make Quilled bird using Quilling Combing Technique :


  • Quilling strips of desired shades
  • Cardboard piece preferebly corrugated ones ( jjust grab one from any packaging boxes)
  • Double sided quilling comb 
  • Outline of a bird
  • Glue, Paper pins, watercolors etc

Step by step procedure to make Quilled bird using Quilling Combing Technique :

There is no hard and fast rule as such for this technique and it basically involves fitting in a coils in a specific flow. So lets first see how to go about it.
First thing you need is the outline of the figure you are going to fill – a bird in my case. I printed out a bird outline from the internet and decided the colors I was going to use for each part. My advice would be to have a bigger canvas because my attempt on a smaller one did not give the desired look. The bigger the better! The present bird outline was made to match a 12’x12′ background.
quilled bird quilling combing technique tutorial (24)
(I had printed out the bird long time back and not started work yet so kinda used it as a rough paper for stamping :P Ignore the mess!)
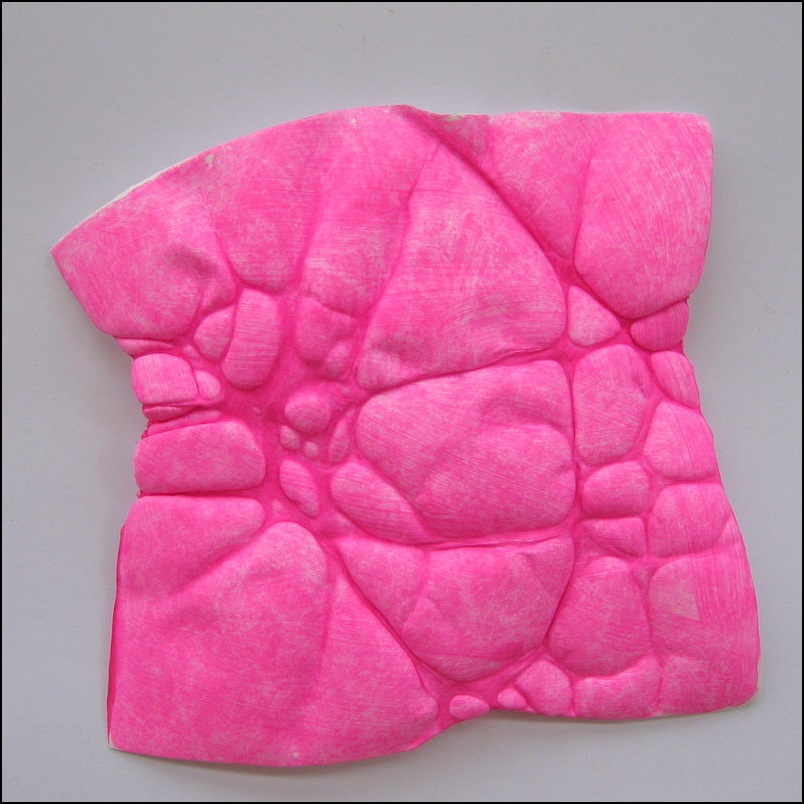
Next thing you need is your quilling comb to make the building blocks. I have used a double sided quilling comb reviewed and used HERE before, for this project as well. You need to make the basic shape of flat coils by looping your quilling strip between the teeth of the comb from inside to outside.
quilled bird quilling combing technique tutorial (24)
  • Make as many as you think might be required in shades as per your selection.
  • Next you need to adhere your outline to your corrugated cardboard and cover it with a transparent sheet of OHP sheet or anything just to make sure your quilled stuff doesnt stick on to your background.
  •  The bad thing about this techniques is that you need to have some sort of imagination and memory recollection talents :P Imagine how the feathers on a bird stay I mean realize the curves and stick your flat coils in the direction of the curves.
I am sharing a few pics that shows you how I made the head part of the bird. If you simply keep sticking them side by side, eventually when you reach the bottom side, you till end up with a huge semicircle shape that you are unable to cover up! So think flow, work flow, quill flow!
Start with making a border from one end and cover about 3/4th of the area in the direction of flow. You can twist and turn your basic shape to curve it as much as you require and secure it with paper pins like in the photograph.
quilled bird quilling combing technique tutorial (26)
Keep adding your shapes side by side by using glue only at the sides. Now the trick is to understand your basic shape : tapering at the ends and thicker at the center which means if you are to get an even layout you should be placing the eye of the shape side to tapered end of adjacent shape just like how you see in the photographs.
quilled bird quilling combing technique tutorial (1)
Once you start feeling that the flow is being disturbed, one trick is to start inserting the shapes in V shape instead of sticking side by side like this “<<<<<<<<“. It will help fill up some space without changing the flow.quilled bird quilling combing technique tutorial (2)
quilled bird quilling combing technique tutorial (3)
So thats how you keep filling in spaces. Also another trick is to fold the basic shape half way just like how did for filling in some space at the wings and body area. See what I mean?
quilled bird quilling combing technique tutorial (4)
quilled bird quilling combing technique tutorial (5)
quilled bird quilling combing technique tutorial (6)
quilled bird quilling combing technique tutorial (7)
The only thing to take care is to 1)Do not stick to the base but stick side to side and 2) try not to break the flow!
I made sectionwise like the head was a piece, wing, tail and rest body another piece and likewise. I make traced a copy of the bird on my actual base and painted it with watercolors close to the color of my quilled bird.
quilled bird quilling combing technique tutorial (8)
I filled up the neck area with small white beads because I somehow couldnt think of filling it up plus I was tired of quilling and dragging this project literally :P ! So one by one I assembled the rest of the quilled parts that were removed carefully from my OHP sheets after they were completely dry and assembled them on my painted base.
quilled bird quilling combing technique tutorial (9)

quilled bird quilling combing technique tutorial (16)
I smudged some green distress inks on the wings to make a shade difference as I thought it looked very plain and undifferenciable.
quilled bird quilling combing technique tutorial (14)
A few simple flowers on the branches to complete the look and here are the final pics.
quilled bird quilling combing technique tutorial (17)
quilled bird quilling combing technique tutorial (21)
quilled bird quilling combing technique tutorial (20)
Since I made each part sectionwise, I made the wings as a second layer so that it kinda looked real and 3D.
quilled bird quilling combing technique tutorial (18)
quilled bird quilling combing technique tutorial (11)
quilled bird quilling combing technique tutorial (13)
Tips for making Quilled bird using Quilling Combing Technique
  • Think of making a big when you want to try quilling comb technique
  • Try to fill in the spaces in the actual flow of the object being made.
  • Decide sections and create your works part by part by using an OHP sheet over your outline as the base. You can later use a fair background with neat coloring over which you can org anise your quilled parts.
  • Glue the base modules side to side and not to the base so that you can remove them easily.
So did you guys get bored with this really long tutorial ?? Well I clearly did not enjoy working on this long project but Im more than happy seeing the end result hee hee !! Quilling is indeed a patience tester but the end result is beautiful and makes you proud! Do share with us your quilled creations as well :)
xoxo Angela

Is nt that 

Monday 17 August 2015

Dylusion Paints Review

Hello Everyone,
Shilpa here,
 I am back today with my review of Dylusion Paints which are designed by
 Dyan Reaveley and released by Ranger earlier this year.

Priya's shop- The Craft Shop stock these bright, cheerful and yummy acrylic colors.


Dylusion paints come in these pots with 12 colors.

These colors co ordinate with Dylusions Ink sprays.

Some of the important features:
  •  These are Semi-opaque 
  • fluid in nature- not too thick and not too thin
  •   Easily bendable
  • Dries quickly
  • After drying they are waterproof
  • a wide opening of color pot is  perfect for art tools, brushes and fingers.
  • Creates flat layer of paint for further stamping on it
  • Can be used on Card stock, Paper, Canvas and many other surfaces
  • Unlike other acrylic painted pages, they won't stick together
  •  Can be cleaned easily with soap and warm water
  • Great for Gelli Printing/ Mono Printing
  • Easy to use with Brayers  
  • accepts all types of writing inks without clogging up the tip
  •  Perfect for layering technique.

I've created journal page with Dylusion paints.


 I love these paints. These are amazing if you frequently art journal or like to doodle, write or draw over painted backgrounds.
Great for card makers for quick backgrounds.
Can be used with stencils easily.


These paints are semi opaque so I created multiple layers with Dylusion paints -  base layer with 2-3 stencils layers , still you can see all layers underneath , that is very interesting. 
And surface remain flat.
For stenciling with Dylusion paints, its better to use Tim's ink blending tool and foam. I do not have small round one, so used regular sponge which caused seepage of extra paint under stencil. So that precaution you need to take.
Another one is...Do not keep open these paint jars for long time..they may dry quickly, especially in our hot weather country.


Usually in mixed media, becoz of lots of texture, it is difficult to stamp on it. But I love the mushroom stamp impression I got here, its crisp and clear on  texture work.


I wrote with Black PIIT pen - Dream, my pen did not clog with paint, which is great thing for art journal and mixed media.

at Ranger You Tube channel you will find more Tips and Techniques by Dyan Reaveley.
here is the link:


Over all I am very happy with Dylusion Paints and you can find more projects with them at my 
personal blog - Neon Diary

Thanks so much for stopping by.


Friday 7 August 2015

Papericious 3D Dome Stickers

Hello crafty friends! How are you all doing? Today I'm here - not with a card but with something really interesting project! Did you know about the Indian Paper Brand called Papericious? They deal with beautiful pattern papers and now they have come up with something interesting called 3D Dome Stickers and Collage Sheets. You should definitely go and check our store - The Craft Shop to purchase them! They are really worth it!


So these are the things I'm talking about. I made a few experiments with these stickers and also I'll give you a few ideas on how to use them!


Just peel off the sticker from the sheet and place it on the collage paper and just trim it! There you go! You'll have a nice, shiny and beautiful embellishment. I think it's great for scrapbooking and for other altered items.


My second one showcases the beautiful butterfly from Prima paper collection. I just placed the sticker on the butterfly and trimmed it out. It's very hard to remove the paper once it is stuck because these dome stickers are so sticky! And be careful about your finger prints too..


I went ahead and created this piece of art.. ;) haha.. just kidding! I traced the circle (size of the dome sticker) and drew this little scene inside the circle, colored it and erased all the pencil lines. I then carefully placed the sticker on to the top of the image! Voila! You can make your custom embellishments too! Yay!!


I traced the circle again and this time I stamped the image and sentiment from Altenew Stamp set, water-colored it and placed the dome sticker.. Tadaaaa!!

What all you can do! 

You can simply place/stuck the dome sticker on any image you like eg. from a magazine, newspaper and also the picture of your loved ones! This doesn't work great on fabric, I tried on two fabrics - one is brasso silk and the other is satin. Both didn't turn out well! So this is not recommended for fabric and ofcourse if you want you can try it. But I think it's super duper fine with paper..

I hope you like this post. If you are interested in any of these supplies you can check The Craft Shop for more details. Thanks for stopping by! Take care.. :)

Copyright © 2015 The Craft Shop
| Distributed By Gooyaabi Templates