Learning more with Studio Multi Medium...
Hello all !!
Hope you all enjoyed the beginning of this year's festive season with Rakhabandhan .
As you all know our this month's challenge is on creating textured backgrounds for your projects.We are overwhelmed to see wonderful enteries in our current challenge and happy to see that you are enjoying having fun creating textures.
Since,I have been given the topic to create textures with Claudine Hellmuth Studio Multi Medium.....today I am here to discuss few tips and techniques using the same. Hope you liked my inspiration project using the same. If you have missed here is the direct link to my post.
Now on to the product..
-300x300.jpg)

1. It is a Ranger product and comes in two finishes....matte and glossy finish.
2. Its basically a gel medium without pigment that's why it dries clear.You can use any acrylic based paint to make the paint into glazes.
3. It works as a resist to distress inks (any water based colors)... but you can easily play with all acrylic based and alcohol based colors.
4. It is acid free,nontoxic,non-yellowing and dries totally clear.Moreover it dries quickly depending on how much thick you have applied.You can even use your heat gun if you are impatient like me.
5. You can use it for gluing,transferring images,sealing and also for your decoupage techniques.The gloss is my favorite finish as it provides a nice and subtle sheen to my project.
6.This is available in 4 oz. jars and 1/2 oz.bottles.
7. It also serves as a paint extender when used with Claudine Hellmuth Studio Paints but as i was not having studio paints i tried it with my acrylic paints, glimmer mists and magicals and the result was awesome.
8. Since these are water based you can wash your brushes under running water....it won't mess up your brushes at all.
Isn't it wonderful....so so so many techniques you can work on with this gel medium.
Today I will be sharing few basic videos and a picture tutorial which I came across the you tube channel and followed while working with this product. I loved watching them and learnt few basic tips from these videos. Hope you also enjoy and learn something new.
Resist technique : Click here to see how multi medium resists with distress inks.
I was not having foam to cut n make a stamp so i tried making a simple retro flower with potato....the same way we use to make when we were kids. It was hand crafted with knife so was not that perfect....but still love the result. I stamped the image and dried it using my heat tool and simply inked it with shabby shutter distress ink.Here is what I came up with...

Spread little medium with knife and dab randomly. Stamp it with black Archival and see the difference...

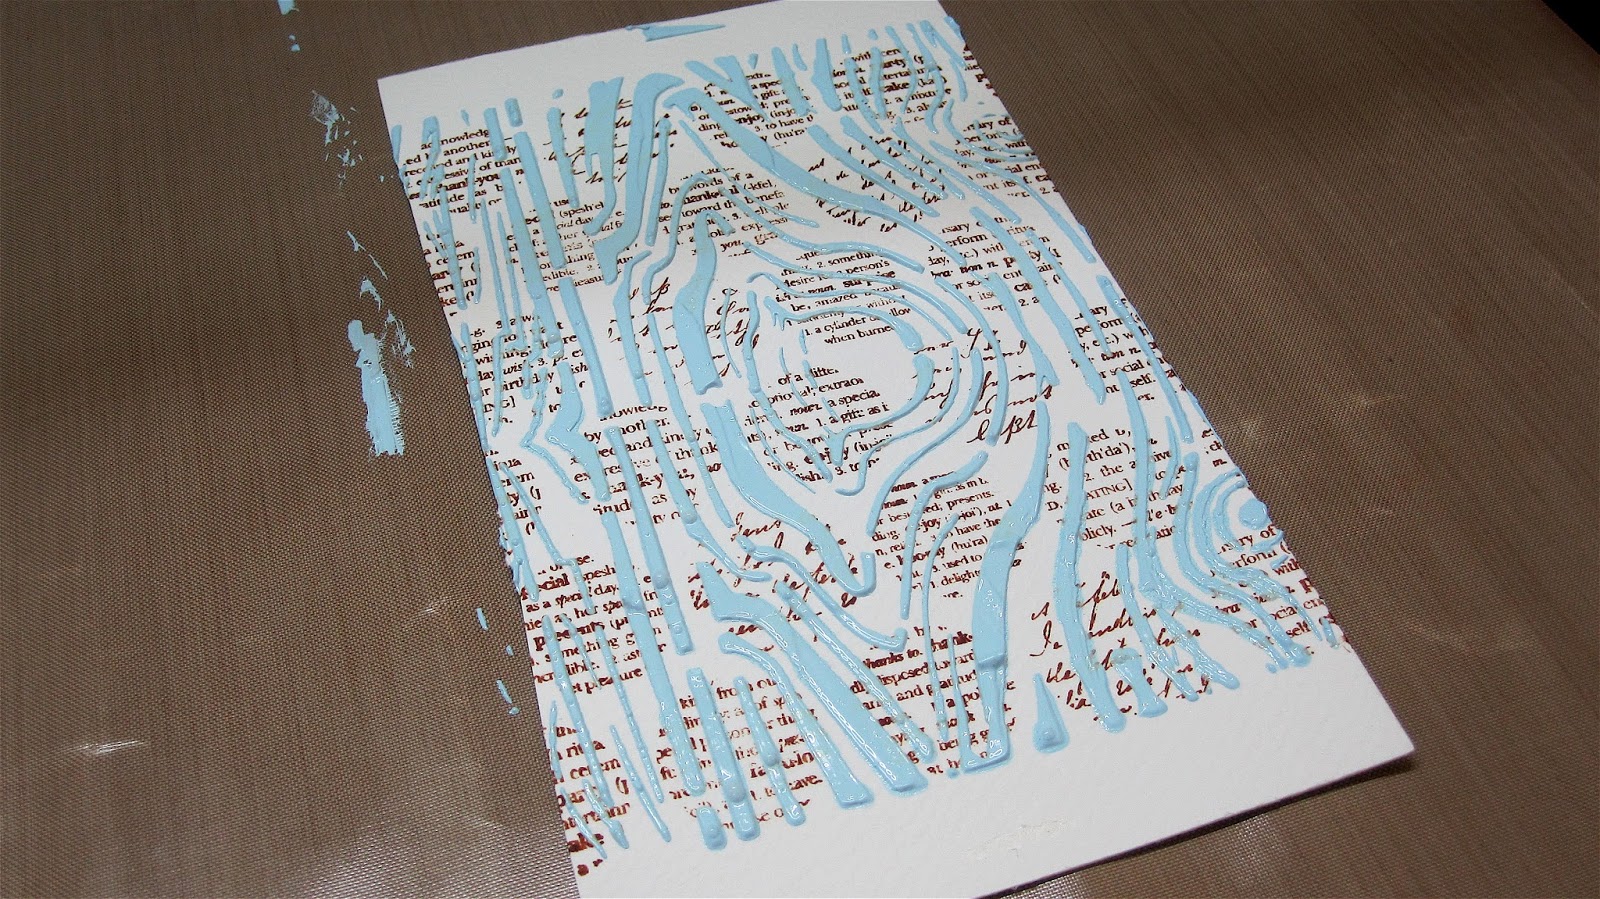
Stencils multi medium resist technique : Click here how u can create awesome backgrounds using stencils. I simply took crafter's workshop template over the card stock and pulled the medium across using old gift card. Dried it with heating tool and then distressed with two different shades of distress inks.

Stencils multi medium resist technique : Click here how u can create awesome backgrounds using stencils. I simply took crafter's workshop template over the card stock and pulled the medium across using old gift card. Dried it with heating tool and then distressed with two different shades of distress inks.

In next tag instead of using card for pulling the medium I simply used flat brush....Same things used but in a slightly different way and u get different results. Its not that prominent in pic...but in reality its different. Just give yourself a try.

Gluing technique or Decoupage technique : Check here to see how simple is the way of gluing paper with medium.These were tried by my daughter under my guidance. Now a days I'm not keeping well. My kidney pain due to stones sometimes irritates me a lot. Hence I often ask my daughter for help. I try pushing her to help me while I'm working on something new and sometimes literally wait for her to come back from school for her sweet little" WOW". I don't force her as.....she's a bit moody but when ever she tries on her own she does pretty well. Have a look what she created.
Isn't it cool !!
Very simple and very elegant. You can use it to make a card, a tag or can use it in your scrapbook page. I'm really really waiting for the time when my daughter will be able to join me in my craft completely. For so many years i'm working all alone but now need her support.

Another one where she tried little bit of mixed media techniques also.


In next tag instead of using card for pulling the medium I simply used flat brush....Same things used but in a slightly different way and u get different results. Its not that prominent in pic...but in reality its different. Just give yourself a try.

Gluing technique or Decoupage technique : Check here to see how simple is the way of gluing paper with medium.These were tried by my daughter under my guidance. Now a days I'm not keeping well. My kidney pain due to stones sometimes irritates me a lot. Hence I often ask my daughter for help. I try pushing her to help me while I'm working on something new and sometimes literally wait for her to come back from school for her sweet little" WOW". I don't force her as.....she's a bit moody but when ever she tries on her own she does pretty well. Have a look what she created.
Isn't it cool !!
Very simple and very elegant. You can use it to make a card, a tag or can use it in your scrapbook page. I'm really really waiting for the time when my daughter will be able to join me in my craft completely. For so many years i'm working all alone but now need her support.
Another one where she tried little bit of mixed media techniques also.
Isn't it cool !!
Very simple and very elegant. You can use it to make a card, a tag or can use it in your scrapbook page. I'm really really waiting for the time when my daughter will be able to join me in my craft completely. For so many years i'm working all alone but now need her support.

Another one where she tried little bit of mixed media techniques also.

Few days back while creating cards I too made one with decoupage technique using same medium. I also added little shimmer to the flowers and gave another coat with the same medium. It depends on your choice to use either matte or the glossy finish.Here is the pic..
Few days back while creating cards I too made one with decoupage technique using same medium. I also added little shimmer to the flowers and gave another coat with the same medium. It depends on your choice to use either matte or the glossy finish.
Here is the pic..

Sealing and creating more textures : You can create background textures using burlap,tissue papers, fabric, laces, paper scrap,....anything you find about in your house.
You can use multi medium as a sealant also.....just like Mod podge. It dries clear. I tried creating textures with different laces with the help of multi medium. A coat of gesso, distress paints and few splits of Lindy's stamp gang can create an amazingly background for your projects.
You can use multi medium as a sealant also.....just like Mod podge. It dries clear. I tried creating textures with different laces with the help of multi medium. A coat of gesso, distress paints and few splits of Lindy's stamp gang can create an amazingly background for your projects.
Isn't it easy !!

Check this one..

Here I created textures with regular tissue paper and sealed sequence with the help of medium gel.Note : As said earlier always keep this in mind that multi medium acts as a resist to water based colors. You will have to either use alcohol based or acrylic paints. Water based colors won't work.
Few days back I tried my hands on Sospeso Transparent and created a background texture with minute glitter balls. I sealed them with studio multi medium. If you have missed to see the complete project here it is.How awesome are the effects!!

Check this one..

Here I created textures with regular tissue paper and sealed sequence with the help of medium gel.Note : As said earlier always keep this in mind that multi medium acts as a resist to water based colors. You will have to either use alcohol based or acrylic paints. Water based colors won't work.


Transferring image: Check here to see how you can transfer images on metal base. You can also transfer it on sticky back canvas or any grunge paper. I'm sharing the video but sorry was not able to try my hands on this technique due to health issues. I promise to come back soon with what I create as early as possible.
Now a simple and a easy picture tutorial for you all....
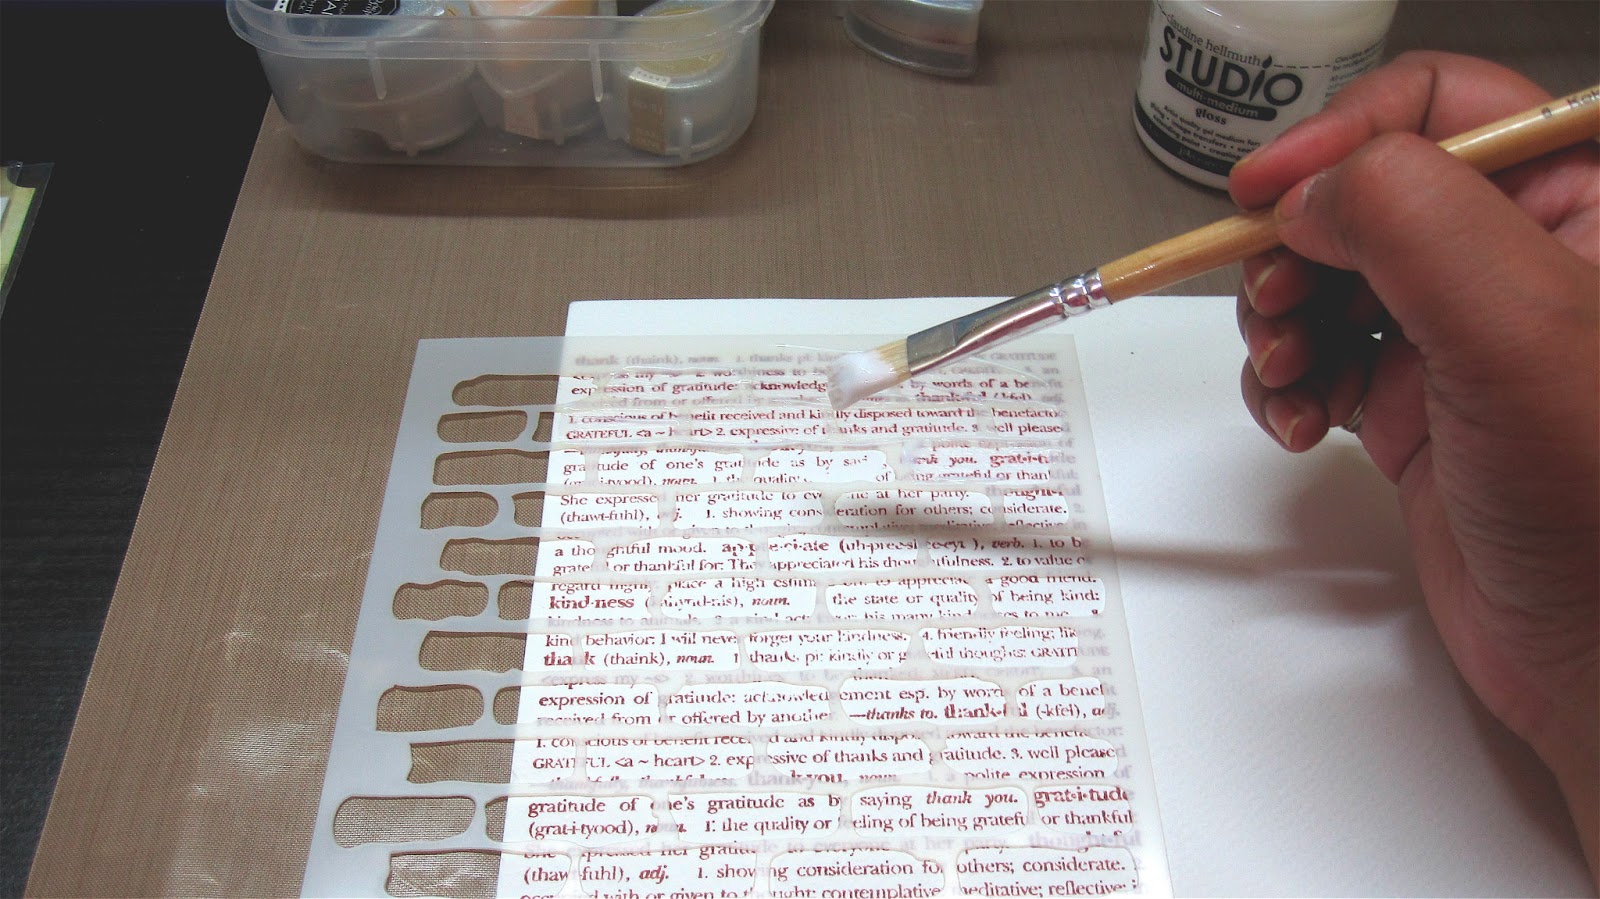
Once surfing through net I came across this picture tutorial on Nancy Keslin's blog and added to my to do list. Today I'll be sharing her tutorial with u. The pictures and her step by step tutorial was too clear for anyone to understand....and hence picked the same from her blog. Thanks Nancy for this wonderful tutorial.
For her project she used Tattered Angels Glimmer Mist in Scarlett, Ranger's Multi Medium in matte, a Crafter's Workshop stencil, an old gift card and some craft sticks. If you don't have mists you can also use magicals or any acrylic paint. I guarantee the result will be awesome with both. You will be in love with the glazed effects you get.

Place a dollop of multi medium on nonstick craft mat.

Spray glimmer mist onto medium.

Mix it well with craft stick

Position your stencil over the card stock

And pull across the medium mixture with old gift card.

And here is the result.