Featured
Showing posts with label heat embossing. Show all posts

Tuesday, 8 March 2016

Cards with Marianne Border Stamps

Hello hello everyone! How are you? This is Deepti Stephens and today I'll be showing you How to Use Border Stamps in a Fun and Creative Way. It's a kind of lengthy post - so many cards and so many pics in one post so just grab a cup of coffee or anything you like, relax and enjoy reading this post. :)

Today I'm going to show you six card designs made by using Marianne Stamps. Did you check them at the shop? No? Go and check after reading the post! These stamps are a must to have in your stash because they are pocket friendly, so versatile and they have great designs too. Let me show you the stamps first that are in stock now.. 


click on the images to go their respective sites

Look at them! They are so wonderful isn't it? I chose Border Stamp - Arrows and made cards out of this stamp set. I'll be showing you how you can use these border stamps in a fun and different way. Always remember 'Imagination is more important than knowledge' :)


Here I sponged the background with mustard seed distress ink and stamp the reel image with mustard seed and grey inks. 


I stamped the reel image on to some Neenah Solar White Card Stock with Archival Jet Black Ink


Then I masked off the edges with post it notes and stamped small images from different stamp set.


I then fussy cut it out and adhered it on to the card base.


Finally stamped the sentiment from Technique tuesday, I bent the sentiment at an angel and stamped just to add a little bit of interest to my card.


Here is the second one! I simply masked the edges of the card stock and stamped the arrows with Black Soot Distress Ink.


And stamped the sentiment from Altenew - Super Script 2 on to some Neenah Card Stock with Hero Arts Neon Pink Ink and fussy cut it and adhered it on to the card base.


I love how this card turned out! The splotchy stamping, colors and everything is funky about this card :)


Here comes the next! I simply placed one of the stamps on to the acrylic block upside down - i.e., the details of the stamps facing the acrylic block and the solid portion looking upwards. 


And stamped on to the card stock with pigment inks


So cool! Isn't it? Here is another one made with the same technique - a kind of color block pattern :)


I used pigments inks for stamping again!


You can also make plaid pattern or any fancy pattern you like.
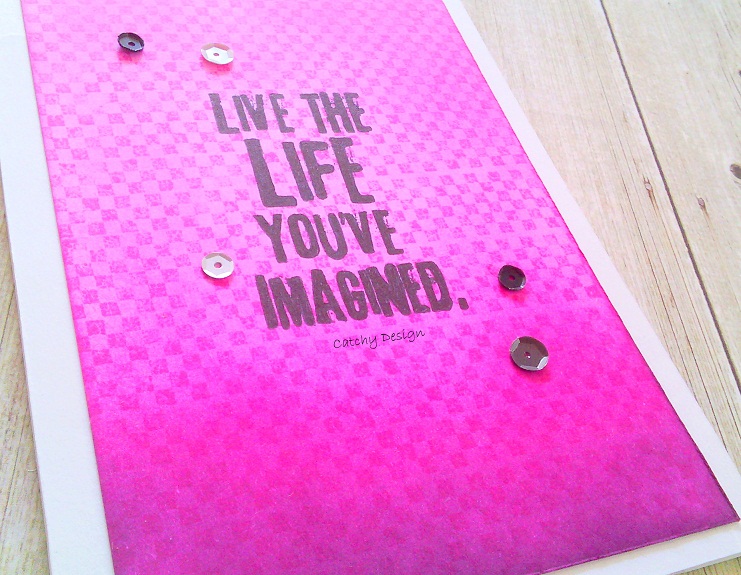

Here is the next one! I ink blended the background with Seedless Preserves and Picked Raspberry Distress Inks. After finishing the blending I stamped the checks pattern repeatedly on the background with Picked Raspberry distress ink.


Look at that cool tone on tone background! (Y) Finally stamped the sentiment with Archival Jet Black Ink.


Here comes the last one -  the most funkiest mixed media kind of card! I didn't know that it would turn out like this :) It's one of the craziest cards ever that I made! LOL!

I partially stamped the diamond pattern with Versamark ink and heat set it with Zing White Embossing Powder. Then I ink smooshed the background with distress inks.


I stamped the sentiment on vellum and adhered it on to the card base. I rubbed the versamark ink on one side of the panel and heat embossed it with gold embossing powder.

And that's it! I hope I gave you some ideas on how to use these stamps and I hope you got inspired. 
Thank you so much for stopping by. See you soon :)

To shop visit - thecraftshop.in

Friday, 23 May 2014

Coloring Vellum

Hello Friends,

How you all doing? Our current challenge is all about embossing -Wet or Dry. Hope you have enjoyed our DT inspiration posts. To inspire you a little more I am sharing a easy tutorial on coloring vellum. Vellum can add interesting and effective embellishments in your projects. I love to heat emboss vellum specially in white.And vellum was the major reason for me to buy heat embossing supplies a year back. Try to add embossed vellum in your projects and believe me, you will too love it. Ok lets head over to tutorial.

Materials Required -

  1. Inkpads - You can choose any ink - dye, distress or pigment. For my tutorial I am using pigment inks. Since pigment inks take a longer time to dry, you can remove excess ink. Take at least two shades of a color to add tone to image
  2. Ear buds - Ear buds will help you to apply and blend ink in smaller areas which cannot be done with daubers or ink blending tools. So buds will work like brushes.
  3. Heat embossed vellum
  4. Tissue -  to remove excess ink or ink over embossed lines
There are basically two ways of coloring vellum - one from front side and another from backside. I will be showing both methods.

Method 1: Coloring vellum from embossed (front) side.
This method is used when intense colors are required on vellum.
1. Heat emboss your image on vellum.
2. Take earbud and apply a light shade on vellum flower.


3. Apply second layer of color. If you go over embossed lines, remove it with tissue.


4. Take darker color ink and apply in center or at areas where you want darker tone.


Method 2: Coloring vellum from back side.
In this method you can use sponge daubers if you want single color flower. I am using cotton bud. Process is same but it gives soft, diffused flower. Here are step by step pictures -


I have also tried coloring with distress inks. Applied again with cotton buds. Here's a sample -


Some more- 

And this a card I have made using above flowers n leaves-


Supplies Used
Distress Inks - mowed lawn, shabby shutters, worn lipstick, spiced marmalade, fired brick
Rangers Heat Gun

I hope you like this tutorial. We would love to hear your feedback. Feel free to ask your queries, we will get back to you. And if you haven't entered yet, hurry up, only few days left before challenge closes.

Till Then
Happy Crafting !!
Poornima

Thursday, 1 May 2014

Challenge #11-Dry / Wet Embossing

Hello Friends,

This is Poornima, hosting this month's challenge. You all know your favourite craft store "The Craft Shop" has completed one fabulous year and you all must have enjoyed the discounts and sale. Thank you for your support and love.
Ok on to the current challenge. This month's theme is

Dry / Wet Embossing

We are asking you to incorporate embossing in your projects or cards. You can either use dry or wet embossing or both.You can apply any technique.We just want to see best out of you. For your inspiration, here are DT's fabulous creations 

Nupur has dry embossed half part of her card. Oh I love the crisp embossing and and image coloring is so lovely.

Tanvi has created this stunning card with heat embossed image in black The image looks fabulous.Tanvi will be revealing secret behind it. So wait and keep an eye on this space.

Charu has used both embossing to create this lovely card. The background is dry embossed and the images on vertical panel are heat embossed. What a nice combo of both types of embossing.

Supplies:

Rajni's card - coming soon

And finally this is my card. I have dry embossed it and followed a simple technique of stamping onto the embossing folder.


Supplies:
Distress inks - Walnut Stain & Mowed Lawn
Tim Holtz Urban Grunge Stamp


To participate, please follow these simple rules - 

  1. Follow our challenge blog.
  2. Link only fresh entries.No backdated entries are eligible.
  3. Link your blog post to our challenge post.
  4. You can participate in a maximum of 5 challenges including ours.
  5. Maximum three entries per person, please add 2 or 3 to your second & third entries.
  6. Remove word verification to help our DTs leave a comment easily.


The TOP 3 will receive a Winners Badge & one random winner will receive a GIFT VOUCHER worth Rs.500 from THE CRAFT SHOP.  For any query regarding any craft supply contact Priya Sivaraj at priyacrafty@gmail.com.


Copyright © 2015 The Craft Shop
| Distributed By Gooyaabi Templates