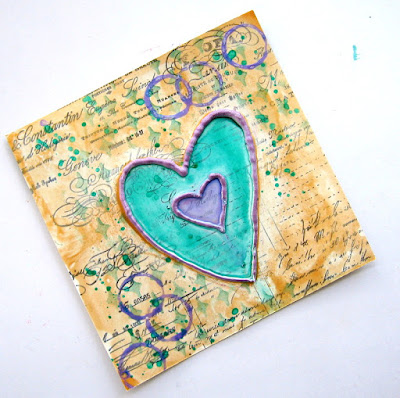
featured

Sunday, 20 September 2015

How to use EzMount for Rubber Stamps

Hello Everyone,
Shilpa here,

Today I would like to share with you my experience with Ez mounted Rubber stamps. Many of you know I love my stamps and specially rubber stamps with artsy designs. Priya's shop The Craft Shop has got fabulous collection of stamps, you can check them all here. 

Have you noticed some of the rubber stamps are 'unmounted' ..what does that mean.. they are not mounted on cling foam.
Crafty Individuals, Designs by Ryn...these stamps are under this category.
Either you can use them sticking on acrylic block with adhesive or you can use EZ Mount


EZMount-Static-Cling-Mounting-Foam-Gray-Foam

EZ Mount comes in 8.5*11" sheet
I recently bought this and I am loving it!! 

here is small tutorial how to mount your rubber stamps on cling EZMount foam.

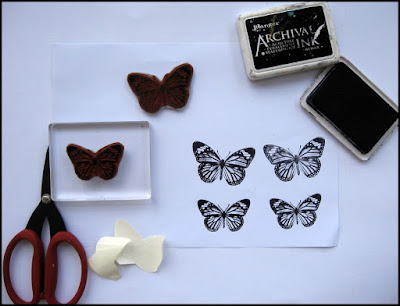
First Without mounting them, I stamped my butterflies using Jet black Archival Ink(for our future reference) .

IMG_5865

Cut all the designs as closely as possible.


IMG_5864

There are two sticky sides to EZ Mount foam. Use the one with instructions written on it.


IMG_5868

Cut the foam according to the size of stamps.


IMG_5871

Peel off the white text paper and stick stamp on it.


IMG_5873

Cutout the side foam close to rubber stamp as much you can. Tim holtz Non-stick scissor works best for this.

I stamped butterfly images after adhering EZ Mount foam
here you will find clear difference.

IMG_5874-001

Yes, with EZMount Cling foam stamp gives crisp image.

I feel this is very good investment for Stampers.
Do try it...you can buy them here.

Thanks so much for stopping by.


Wednesday, 16 September 2015

Different Ways to use Jones Tones Ultra Puff Paints

Hello Everyone,
Shilpa here,


JTPP_Jones_Tones_3D_Puff_Paint_01

Have you checked Jones Tones Puff and Glossy 3D paints at Priya's The Craft Shop yet!

And Good news is- they are in 25% off
check them here

Let's know more about them!
  • there are 2 types of 3D paints available- Puff and Glossy
  • they come in very ergonomic designed tube with super fine tip.
  • Can be used on Paper, Wood, Glass, Ceramics and Pottery.
  • Can be cleaned with water when it is wet.
  • Permanent colors
  • Soft and stretchable 

Here are few uses:

Decorate Frames

dabd3a87717613bd9c33fa646ef3ae80
 (Source- Pinterest)


Alter Bottles or Mason Jars 

0b1a28d6bb2fd9a2b50145fecea65db2
(Source- Pinterest)


Decorate Candle (you can use Jone Tones 3D Glossy for this)

216ae0b829b5154111adcd28a64caf03
(Source - Pinterest)

Decorate Tshirts

b7a58aba7a8a220bc02b94ef3f06d7c2
(Source - Alisa Burke blog )


Use on your cards

66c73b3399120e9856b67502176aeecc
(Source- Pinterest)

Decorate your handmade flowers
4b7baabdda8e7bdf4794e5e717f607bd
(source- Pinterest )

    Make pearl swirls

    IMG_5821
    Easy Embellishments

    IMG_5824
    You will find here- Puff paints puff after heating with heat tool, creates wonderful texture.
    Sprinkle glitter on it when it is wet, creates beautiful embellishments 

      here is easy Mixed media background technique Tutorial with Jones Tones 3D paint...

      IMG_5819

      Stamp with background text stamp (here I've used Heidi Swapp) with Jet black Archival ink.
      Draw desired shape with Jones Tones puff paint. Let it dry. (takes 2-3 hours)


      IMG_5826

      Give the whole surface a coat of white gesso.


      IMG_5828

      Fill in water colours.

      IMG_5830

      Apply distress ink through stencil.


      IMG_5833

      Add some splashes of paints, circles of colors.....just for interest. 
      Highlight raised area with Viva Decor Ink gold
      and our background is ready

      IMG_5836

      Cut this according to your project need, you can make card, tag or small canvas with this...just need to add flowers and embellishments!

      Do try Jones Tones Puff Paints!!
      Grab it till they are in 25 % off Sale

      For more mixed media projects visit my blog - Neon diary

      Thanks so much for stopping by.


      Sunday, 30 August 2015

      Abstract Art with Tyvek

      Hello Everyone,
       Shilpa here, 
      I would like to share with you today, how we can create texture with Tyvek for mixed media abstract art work.
      here comes my first piece with Tyvek...

      20150831_161955


      Tyvek is a synthetic material consisting of Spun bound Olefin fiber. This material is very lightweight, strong, difficult to tear, but can be cut with Scissors/cutters. It is waterproof. 
      It is mainly used for as Housewrap while construction, for making envelopes.
      Priya has a stock of Tyvek in 12*12" size in her shop The Craft Shop


      IMG_5666


      But we crafters have different use- 
      As it is strong and durable - Used for Scrapbook binding.

      and recently I found out its use in mixed media work...!


            so let's see how I created the texture on tyvek

          cut to a size that suits, Paint the Tyvek.

      I've used different paints to try how it turns out.

      IMG_5668

      We have to provide heat to this it can be done with Iron or Heat Tool. both gives almost same results.

      Keep painted side down. Lay a sheet of baking paper/parchment paper/ protecting sheet over it and gently iron on high temp., actually you will have to hover the iron, and watch as the tyvek shrinks and shrivels and stop when your happy with the result. 

      the above sheet turned out something like this which I painted with regular acrylic color.

      IMG_5680

       I've also experimented with other kinds of colors


      IMG_5670

      Colour Arte Silks Acrylic glaze painted paper, turned out to be

      IMG_5682

       
      IMG_5672

       Alcohol ink splattered Tyvek, after heating turned out ...

      IMG_5684

       
      IMG_5674

      Distress Stain- Fossilized Amber 


      IMG_5677

      Color Arte Silk acrylic glaze - Honey Amber and Plum blossom

      IMG_5681

      This had got lovely two tone effect.

      IMG_5679

      Fevicryl Pearl Blue

      IMG_5683

      I love this shiny piece with bubble texture.

      So how to use it:

      *These are fabulous backgrounds for cards.

      * Can be used as embellishments.

      * Great for any mixed media backgrounds.

      I'll be going to do further experiments with Tyvek, do you?

        Thanks so much for stopping by.


      Thursday, 27 August 2015

      Quilling Combing Technique using Double side Quilling comb : Quilled Bird

      Hello girls! 

           This is Angela here from thecraftyangels. Im here today with a quilling tutorial that has been done with help of double sided quilling tool. Hope you guys enjoy this :)
      P.S – This is a picture heavy post. Please enjoy reading through while they all load :)
      quilled+bird+quilling+combing+technique+tutorial+%252823%2529

      This is a project I started working on along with quilled flower I made with double sided quilling comb (HERE). But somehow as I had very rightly anticipated, bigger projects are totally not my cup of tea and I have been dragging this so much that right now I have stopped everything else to just get done with this! I need to find a perfect frame for this quilled bird made using quilling combing technique but yeah well..maybe after a while :P! Thankyou Priya for giving me the push to create something different .com/blogger_img_proxy/ Yeah so for anyone who want to buy this double sided quilling comb that I have used for this quilled bird, HERE is the link to product.

      Materials required to make Quilled bird using Quilling Combing Technique :


        IMG_1699
      • Quilling strips of desired shades
      • Cardboard piece preferebly corrugated ones ( jjust grab one from any packaging boxes)
      • Double sided quilling comb 
      • Outline of a bird
      • Glue, Paper pins, watercolors etc

      Step by step procedure to make Quilled bird using Quilling Combing Technique :

      There is no hard and fast rule as such for this technique and it basically involves fitting in a coils in a specific flow. So lets first see how to go about it.
      First thing you need is the outline of the figure you are going to fill – a bird in my case. I printed out a bird outline from the internet and decided the colors I was going to use for each part. My advice would be to have a bigger canvas because my attempt on a smaller one did not give the desired look. The bigger the better! The present bird outline was made to match a 12’x12′ background.
      .com/blogger_img_proxy/
      (I had printed out the bird long time back and not started work yet so kinda used it as a rough paper for stamping :P Ignore the mess!)
      Next thing you need is your quilling comb to make the building blocks. I have used a double sided quilling comb reviewed and used HERE before, for this project as well. You need to make the basic shape of flat coils by looping your quilling strip between the teeth of the comb from inside to outside.
      .com/blogger_img_proxy/
      • Make as many as you think might be required in shades as per your selection.
      • Next you need to adhere your outline to your corrugated cardboard and cover it with a transparent sheet of OHP sheet or anything just to make sure your quilled stuff doesnt stick on to your background.
      •  The bad thing about this techniques is that you need to have some sort of imagination and memory recollection talents :P Imagine how the feathers on a bird stay I mean realize the curves and stick your flat coils in the direction of the curves.
      I am sharing a few pics that shows you how I made the head part of the bird. If you simply keep sticking them side by side, eventually when you reach the bottom side, you till end up with a huge semicircle shape that you are unable to cover up! So think flow, work flow, quill flow!
      Start with making a border from one end and cover about 3/4th of the area in the direction of flow. You can twist and turn your basic shape to curve it as much as you require and secure it with paper pins like in the photograph.
      .com/blogger_img_proxy/
      Keep adding your shapes side by side by using glue only at the sides. Now the trick is to understand your basic shape : tapering at the ends and thicker at the center which means if you are to get an even layout you should be placing the eye of the shape side to tapered end of adjacent shape just like how you see in the photographs.
      .com/blogger_img_proxy/
      Once you start feeling that the flow is being disturbed, one trick is to start inserting the shapes in V shape instead of sticking side by side like this “<<<<<<<<“. It will help fill up some space without changing the flow..com/blogger_img_proxy/
      .com/blogger_img_proxy/
      So thats how you keep filling in spaces. Also another trick is to fold the basic shape half way just like how did for filling in some space at the wings and body area. See what I mean?
      .com/blogger_img_proxy/
      .com/blogger_img_proxy/
      .com/blogger_img_proxy/
      .com/blogger_img_proxy/
      The only thing to take care is to 1)Do not stick to the base but stick side to side and 2) try not to break the flow!
      I made sectionwise like the head was a piece, wing, tail and rest body another piece and likewise. I make traced a copy of the bird on my actual base and painted it with watercolors close to the color of my quilled bird.
      .com/blogger_img_proxy/
      I filled up the neck area with small white beads because I somehow couldnt think of filling it up plus I was tired of quilling and dragging this project literally :P ! So one by one I assembled the rest of the quilled parts that were removed carefully from my OHP sheets after they were completely dry and assembled them on my painted base.
      .com/blogger_img_proxy/

      .com/blogger_img_proxy/
      I smudged some green distress inks on the wings to make a shade difference as I thought it looked very plain and undifferenciable.
      .com/blogger_img_proxy/
      A few simple flowers on the branches to complete the look and here are the final pics.
      .com/blogger_img_proxy/
      .com/blogger_img_proxy/
      .com/blogger_img_proxy/
      Since I made each part sectionwise, I made the wings as a second layer so that it kinda looked real and 3D.
      .com/blogger_img_proxy/
      .com/blogger_img_proxy/
      .com/blogger_img_proxy/
      Tips for making Quilled bird using Quilling Combing Technique
      • Think of making a big when you want to try quilling comb technique
      • Try to fill in the spaces in the actual flow of the object being made.
      • Decide sections and create your works part by part by using an OHP sheet over your outline as the base. You can later use a fair background with neat coloring over which you can org anise your quilled parts.
      • Glue the base modules side to side and not to the base so that you can remove them easily.
      So did you guys get bored with this really long tutorial ?? Well I clearly did not enjoy working on this long project but Im more than happy seeing the end result hee hee !! Quilling is indeed a patience tester but the end result is beautiful and makes you proud! Do share with us your quilled creations as well :)
      xoxo Angela

      Is nt that 
      Copyright © 2015 The Craft Shop | Distributed By Gooyaabi Templates