Featured

Wednesday, 27 May 2015

Inspirations for Papericious Wooden Collection

Hello dear friends! This is Deepti here with a few cards using Papericious Wooden Collection. Who doesn't love woodgrain collection? I love it and I just love it.. ;)

(it comes both in A5 and 12x12 packs)

So today I'll be sharing a few cards like how to use these papers in different ways. So let's get started..

1. You can simply hand draw a tree branch..

(paper smooches chilly chums stampset)

2. Here is an-other example.. I drew a fence here..


3. Can make a masculine card, I used my scraps to make this card.


4. You can simply paper piece the images..

(fiskars and teressa collins stamset)

5. You can make some funky and fun love cards.. ;)

(darcie stampset)

6. or you can make windows, doors and etc on your cards.

(bo bunny and inkadinkado flower stamset)

So these are the few ways to use these wooden papers and also you can go wild with your imagination. Hope you like the cards. Take care and I'll see you next time.. :)

Monday, 25 May 2015

Funky House with Fireworks!

Hello Everyone,
Shilpa here,
I am back with another project using Memento Firewoks spray inks.
If you have missed my earlier post with Fireworks Tips and techniques...you will find it here.

Now....its about today's mixed media funky house,
 I've altered MDF house


Let's see the process..


You know, how much I love to create texture... I applied Prima Art Basics Platinum crackle texture paste through stencil for the roof. Before that I primed the whole MDF house with gesso. Dried it completely.


On the wall, I created rough texture with Ranger Multi medium matt and palate knief


When all paste dried completely, I colored the walls with Bahama Blue Fireworks spray ink and door with Bamboo leaves Fireworks


I added handmade leaves and flowers on the roof...


 and near the front door. Adhered cute button as door knob...and my house is ready!

Fireworks are easy to work sprays and have some lovely range of colors in that cute little bottles.


If you are liking this, do try your Memento fireworks spray inks on different surfaces.


Products used from The Craft Shop:
MDF House
Ranger Multi medium  Matt 

 Thanks So much for stopping by.


Monday, 18 May 2015

Altered Bottle with StazOn Midi

Hello Everyone,
Shilpa here,

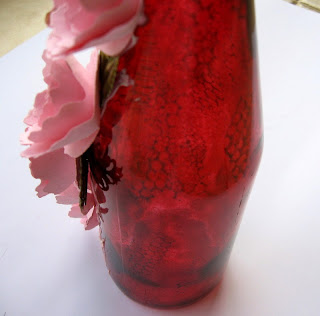
I am continuing my projects with StazOn Midi. I've Altered the bottle using StazOn and here it is....


I would like to share with you, where did I use StazOn. As I've explained in detail in my earlier blog post (here), StazOn works on any porous and non porous surfaces.


I cleaned my bottle properly to remove any dust and applied StazOn Claret with sponge onto the bottle. I love the way it took the colour. It dries fast and does not smudge.


I created texture with Modeling paste and stencil.


for more texture, I stamped on to it with StazOn Ganache. 


I've applied Stazon on charms as well to match with bottle...here I've used, Stazon Claret and Stazon Cactus green.


Hope you liked my new altered art! 
Do try these StazOn Midis.....they are available in The Craft Shop!

Thanks so much for stopping by.

Products used from The Craft shop:
Modeling Paste
Charms


Saturday, 16 May 2015

Project with Gelli plate background

Hello Everyone,
Shilpa here,

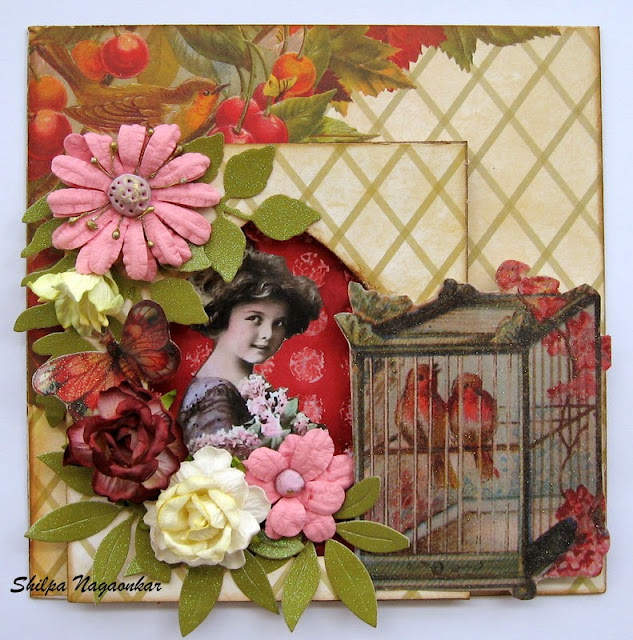
I've a small post to share with you today. I had made several Gelli plate print backgrounds with Gel medium resist technique. You will find my detail post here. I've used one of them today for my 
Vintage Garden project


Can you find where I've used it? Yes it is behind that girl. Isn't it look pretty!
and here was the original one I made 


I've used many papers from DCWV Botanical Stack and Cardstock stack.


Hope you liked my project.
The Craft Shop has Gelli plates available in 3 different sizes. Bigger ones can be used for big surfaces and smaller ones can be used for cards and tags. They are easy and fun way to prepare backgrounds. As I've done here, you can make and keep several prints and use them in your project when needed. This way we can save the time and work faster!

Friday, 15 May 2015

Krylon Leafing Pen Review - Trials and Errors..

Hello dear friends! Welcome back to another post here at CCC blog and this is Deepti here with the review on the most gorgeous, elegant and fantastic product 


It comes in Copper, gold and pale gold, red and silver. But I have got only 2 colors i.e., Gold and Copper so today I'll be showing you my trials and errors with these pens. 

 What is a Krylon Leafing pen?
A Krylon Leafing pen is a smooth flowing paint pen. It adds a high quality metallic accents to any surface, with a finish that resembles metal plating. It has chisel tips that draw thick or thin lines on wood, metal, plastic, glass, craft foam, plaster, ceramic, fabric, paper and more. It allow you to vary the width of your paint strokes, making them perfect for calligraphy. All you need is a little imagination! Leafing Pen dispense a fast-drying, metallic paint for highlighting any art, craft, or home decorating project.

 How to use it?
Shake the pen and press the nib on paper and start working

My experience
Do's and dont's - The chisel nib comes off easily so always put the cap on and shake it before using. If you don't put the cap on and shake, the ink will spill all around..It just happened to me, my pattern papers, cardstock and my hands got spoiled. So just be careful.. ;)

Is it permanent?
Yes! it is permanent. If your hands get stained use soap water to remove the stains.

How it can be used in paper crafting?
We all love paper! Yes! Since being a crazy card maker I found out a few ways to use these Krylon Leafing Pen Uses.. 

My trials and errors

1. Creating Backgrounds

Yes! You can create beautiful backgrounds with these pens by drawing horizontal, vertical or diagonal lines. Or you can  simply create your own pattern. I simply drew the horizontal lines.. :)


2. Calligraphy

Yes! You can write your favourite sayings or quotes.. 
Please excuse my bad bad hand writing.. :(


3. Creating borders

You can create funky and elegant borders.. Look at these pics.. 

Pic 1
See how I created the border on the tag

pic 2

Look how I created the border on this card.. :)

4. Coloring/Painting

a) Coloring/Painting MDF laser cuts


b) Coloring/Painting diecuts


c) Coloring/Painting threads


5. Faux Embossed Images

I have a tiny tutorial.. Kindly go through it..


Take a piece of cardstock and paint the area, where you want to stamp. Then allow it to dry for some time.


Then stamp your desired image in versamark ink and heat set it with white embossing powder.


Look how beautiful it is.. ;)

Don't do it
Do not apply the paint after heat embossing the image because the embossed image cannot resist the paint.. Please look at the picture here..


And here is the card I created only with 18KT Gold Leafing Pen.. :)


Here is an other project highlighting painting mdf and die-cuts


I hope you have got some idea on how to use these leafing pens. And I hope you enjoyed reading this post.. If you are interested in buying these leaafing pens Kindly visit The Craft Shop and fill your cart with some awesome products.

Thanks for being with me till the very end of the post. Take care and I'll see you next time.. :)

Products used from The Craft Shop


Monday, 11 May 2015

Fireworks Sprays and StazOn Midi Tips and Techniques

Hello Everyone,
Shilpa here,
Today, I've another mixed media project to share with you. I also have easy step by step tutorial...which anyone can follow.


Imagine Crafts Fireworks Ink sprays were the first among my Ink spray collection and still I use them!
They come in tiny bottles with 15ml ink. Perfect size for beginners as well as for crafters who wants to try new colors always...like me!
The Craft Shop has 12 beautiful colors in stock....


Before we move forward I want to talk about these spray inks,
  • they are water based inks
  • Add color with metallic sparkle and shimmer to your artwork
  • Can be used on both light and dark papers for different but equally stunning effects
  •  Fast drying on most paper surfaces
  • Can be used for large surface or for coloring small images. 
 And another great product I've used here are StazOn Midi Ink Pads, 6 lovely colors are available at The Craft Shop


  • they are medium size ink pads from StazOn
  • easily stack able
  • they can be used on porous surfaces like paper or   non-porous surfaces like glass, metal, ceramic, and more 
  • after drying ink will be permanent. 
now...Let's see how I made this mixed media project,
For a base, I cut out DCWV card stock and adhered it to thick chipboard. Applied gesso to my surface, as I wanted to play with lot of mediums.
For background texture, I applied Prima Platinum Crackle texture paste through Prima Grungy Grid stencil. Awesome subtle crackles appeared after drying.


Another layer of texture with my fun collection. I had these wood veneer pieces and small round stones in my stash, I adhered them with Aleen's Glue.
another layer of Gesso, this step is important, as we are coloring the veneer pieces. Gesso works as base coat.
 
and here comes the Fireworks.. I've used Lulu lavender, Paris Dusk and Cottage Ivy colors. I spritzed water to spread the colors.


Next step is background texture stamping..I've used Finnabaire Rust and dust and Prima Epiphany stamp. Here I've used StazOn Midis in Midnight blue, Ganache and Cloudy sky becoz they are permanent inks..and do not spread if I add water on it.  
 Here is the close look...love the grungy effect created with stazon midi and stamps.
They stamped beautifully on sleek/glossy surfaces like veneer and did not smudge....loving them!


To define the edges of our texture, I bordered them with Faber Castell PIIT pens. I also applied
 Midnight blue ink with sponge to stone surfaces...I am customizing them according to project.


For interesting part of our project are these Crazy birds by Stampers Anonymous. I stamped them with Claret StazOn Midi and colored them with Lady bug Fireworks spary ink.
You will notice some design texture on them...it was an happy accident, I've used paper with Gel medium on it thinking it is black watercolor paper. It is from my last post with Gelli plate and Gel Medium...if you have missed it ..can find here.
 here are more close up views of my this project...


Thanks so much for stopping by, let me know if you like this post.


Copyright © 2015 The Craft Shop
| Distributed By Gooyaabi Templates