featured

Tuesday, 8 March 2016

Cards with Marianne Border Stamps

Hello hello everyone! How are you? This is Deepti Stephens and today I'll be showing you How to Use Border Stamps in a Fun and Creative Way. It's a kind of lengthy post - so many cards and so many pics in one post so just grab a cup of coffee or anything you like, relax and enjoy reading this post. :)

Today I'm going to show you six card designs made by using Marianne Stamps. Did you check them at the shop? No? Go and check after reading the post! These stamps are a must to have in your stash because they are pocket friendly, so versatile and they have great designs too. Let me show you the stamps first that are in stock now.. 

marianne-design-clear-stamps-borders-stamp-arrowsmarianne-design-clear-stamps-borders-stamp-dots+%25281%2529

marianne-design-clear-stamps-borders-stamp-dotsmarianne-design-clear-stamps-borders-stamp-stars
click on the images to go their respective sites

Look at them! They are so wonderful isn't it? I chose Border Stamp - Arrows and made cards out of this stamp set. I'll be showing you how you can use these border stamps in a fun and different way. Always remember 'Imagination is more important than knowledge' :)

cc5

Here I sponged the background with mustard seed distress ink and stamp the reel image with mustard seed and grey inks. 

cc16

I stamped the reel image on to some Neenah Solar White Card Stock with Archival Jet Black Ink

cc15

Then I masked off the edges with post it notes and stamped small images from different stamp set.

cc14

I then fussy cut it out and adhered it on to the card base.

cc6

Finally stamped the sentiment from Technique tuesday, I bent the sentiment at an angel and stamped just to add a little bit of interest to my card.

cc4

Here is the second one! I simply masked the edges of the card stock and stamped the arrows with Black Soot Distress Ink.

cc13

And stamped the sentiment from Altenew - Super Script 2 on to some Neenah Card Stock with Hero Arts Neon Pink Ink and fussy cut it and adhered it on to the card base.

cc3

I love how this card turned out! The splotchy stamping, colors and everything is funky about this card :)

cc12

Here comes the next! I simply placed one of the stamps on to the acrylic block upside down - i.e., the details of the stamps facing the acrylic block and the solid portion looking upwards. 

cc17

And stamped on to the card stock with pigment inks

cc18

So cool! Isn't it? Here is another one made with the same technique - a kind of color block pattern :)

cc2

I used pigments inks for stamping again!

cc1

You can also make plaid pattern or any fancy pattern you like.

cc9

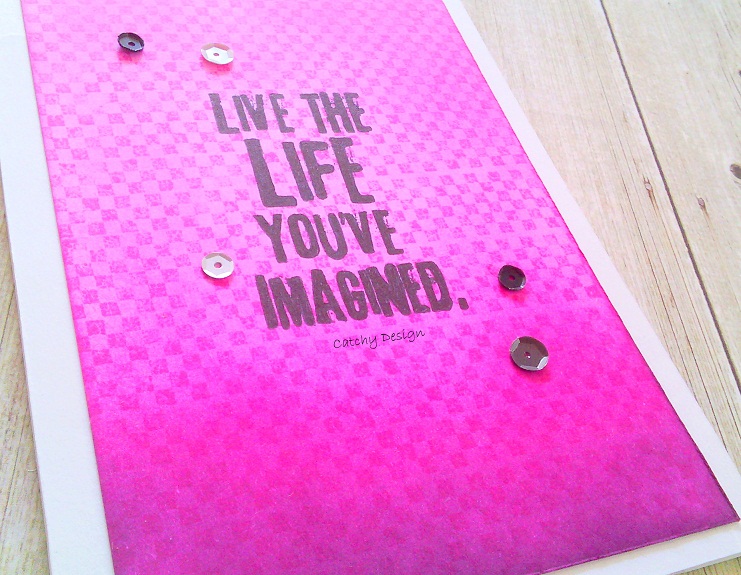
Here is the next one! I ink blended the background with Seedless Preserves and Picked Raspberry Distress Inks. After finishing the blending I stamped the checks pattern repeatedly on the background with Picked Raspberry distress ink.

cc20

Look at that cool tone on tone background! (Y) Finally stamped the sentiment with Archival Jet Black Ink.

cc7

Here comes the last one -  the most funkiest mixed media kind of card! I didn't know that it would turn out like this :) It's one of the craziest cards ever that I made! LOL!

I partially stamped the diamond pattern with Versamark ink and heat set it with Zing White Embossing Powder. Then I ink smooshed the background with distress inks.

cc19

I stamped the sentiment on vellum and adhered it on to the card base. I rubbed the versamark ink on one side of the panel and heat embossed it with gold embossing powder.

And that's it! I hope I gave you some ideas on how to use these stamps and I hope you got inspired. 
Thank you so much for stopping by. See you soon :)

To shop visit - thecraftshop.in

Wednesday, 27 January 2016

COLOURING AND LAYERING OF STAMPED IMAGES-A TUTORIAL BY ANITA KEJRIWAL

Hello everyone, 
This is Anita Kejriwal here and I am here to share with you a tutorial on stamping and colouring and layering.

Stamping and colouring is a favourite passion of mine and colouring stamped images is something that is very close to my heart. Seeing the black and white images emerge as coloured ones, fill my moments and my heart with joy. So here, I am sharing with you something that I immensely love .


COLOURING AND LAYERING OF STAMPED IMAGES.

You all are familiar with colouring. However , I have done a short video tutorial to show how I colour my images especially floral images. I have used the Zig brush pens, although you can use any colouring medium of your choice. Please follow this video for colouring part and for the layering part, please follow the step by step pictures given below. each picture is well explained. But before we begin, let me tell you a little about layering. This is just breaking up your image into several layers beginning from the bottom to the top most and layering them on top of each other to create a 3D effect. This requires lot of visual play by your eyes to be able to understand which layer comes when. Although the method is bit time consuming, but the end result  is super beautiful. So, its worth all the effort.
This is PICTURE HEAVY POST !!!!! So please be patient and just follow each step. I have used the Rose stamp from Impression Obsessions but you can use any image of your choice. I would advice you to begin with simple stamps and move on to more complicated ones. 
So lets begin !!!!!

image


A video tutorial on watercolouring


So now that your colouring is done, lets start layering.

First cut out all the stamped images with a nice sharp scissors taking to cut the most detailed part as much as close as possible. Just study the image and then break up into several layers like in the picture below.

image

image


In this picture below, note how I have cut out the leaves and rose. I have disintegrated the rose in three parts. outer middle and inner most. Leaves are few more to add more layers beneath.

image
     

                           Always remember to colour the edges with a dark brown or black pen as the                                                   white edges really look bad. Colouring of the edges helps the final                                                                                       image to emerge as one.


image


Then apply double sided foam tape to all the layers at the back. Take care to cover as much area as possible.

image

image


In this picture below, lay down the first full image on to the base layer taking care to match them perfectly over each other. On this base , other layers will come.

image


This how the layers will come. Now just follow the image, leaves below will come down and so will all the other layers.

image
 
This is how the final result will be.

image


To create the card, I took a base 8/8 inches and the took the same stamp and stamped it all over the front with antique linen, as in the picture below.


image
 
Then using the lightest shade of yellow and green paint the images with very watery brush strokes, Basically I am creating a very subtle background to compliment with my focal stamped image.

image
 

Then I used this spellbinder card creator die set to create a layered window and matted it on green                                                                            card stock
image
                                     

                                         I have also used these die cuts to embellish my card.
image
                                         

                                               finish of the card,by placing all the elements together.
image
                                                   

                                                    This is how the final project looks like.
image


 So you see, how beautiful this process is. It makes the most simplest image breathtaking. So now, just gather your supplies and get going. All the supplies here, are easily available at thecraftshop.in--an awesome craft supply store that has the best brands with them. So let me see, what you come up with. Please feel free to ask me anything if you do not understand or any other details.

I hope you like this post. I will be coming up with more such lessons in future. So do leave your comments as to what you would like to see. Your words mean a lot to me so please do give your feedback. Thanks a ton for being so patient with me. HAPPY CRAFTING!!!!


Copyright © 2015 The Craft Shop | Distributed By Gooyaabi Templates