Featured

Tuesday, 14 April 2015

Perfect Pearls...

Hello hello dear lovely ladies! This is Deepti Stephens here on Color Conceptions blog. Yay! don't you love this?? :p. Yes! I'm absolutely loving and humbled by this honour. Thank you Priya for giving this wonderful opportunity to showcase and to share a few tips and techniques on your blog (many more in future).. 

Well.. ok..Today I'm here to share with you all a few tips and techniques about

Perfect Pearls

These perfect pearls are pigment powders that give a pearlascent finish on your project. The powders can be used in a variety of ways, however, perfect medium has been designed to work with perfect pearls and also it comes with a detail and dusting brushes.


Perfect medium is just like water mark ink. You can use any kind of 'embossing inks' with these perfect peals. But today I'll be using 'versamark ink' instead of Perfect Medium because versamark ink gives crisp image while stamping..

Here is the example..


And also I tried these 'perfect pearls' on different types of cardstocks like regular white cardstock, water color paper, black cardstock and on some vellum. After trying on all these papers I found that 'black cardstock' is best for these perfect pearls. 

Here is the example..


Okay! Today I'll be sharing 4 ways to use these Perfect Pearls. I hope many of you know these techniques but if you are new to crafting and wondering what's these perfect pearls?? then please go ahead and read the post and yeah! I have a video too and if you don't wanna read all this, skip this part and straightly go for the video (you can find it at the end).. :D

Four Ways To Use Perfect Pearls

1. Pouncing Perfect Pearls
a) Single Color
b) Multicolor

Note : To set the perfect pearls on to the paper just simply spray a little amount of water.
(watch the video for more details)

single color

Multicolor

2. Water-coloring with Perfect Pearls
a) Direct
b) with Distress ink
c) with Marker
d) with Gelatos


I love the coloring part with distress ink, marker and gelatos. But somehow I didn't like the look of Perfect Pearls directly on the white paper but it looks great on black cardstock.. I think the color on white is not that solid..

3. Flicking Perfect Pearls


Such a cool technique. you can create night sky, galaxy back grounds and snow fall back grounds etc by this technique..

4. Perfect Pearl Mist


It's so simple.. Take a little amount of water in your spritzer bottle, then pour a little amount of your desired perfect pearl powder and shake it well.. And that's it your mist is ready.

For more details please watch the video


I hope you like this post and I hope you got inspired! Thank you so much for stopping by and leaving me a comment.. Take care and I'll see you next time.. :)

Sunday, 1 March 2015

Gelli Plate and Ink Sprays

Hello Everyone,
Shilpa here,
I am back with another project created with Gelli plate printing!!

I made a Journal page today and the theme is - Paris.

Lets see the procedure to make our background. Usually creating background is as important as your focal point. 


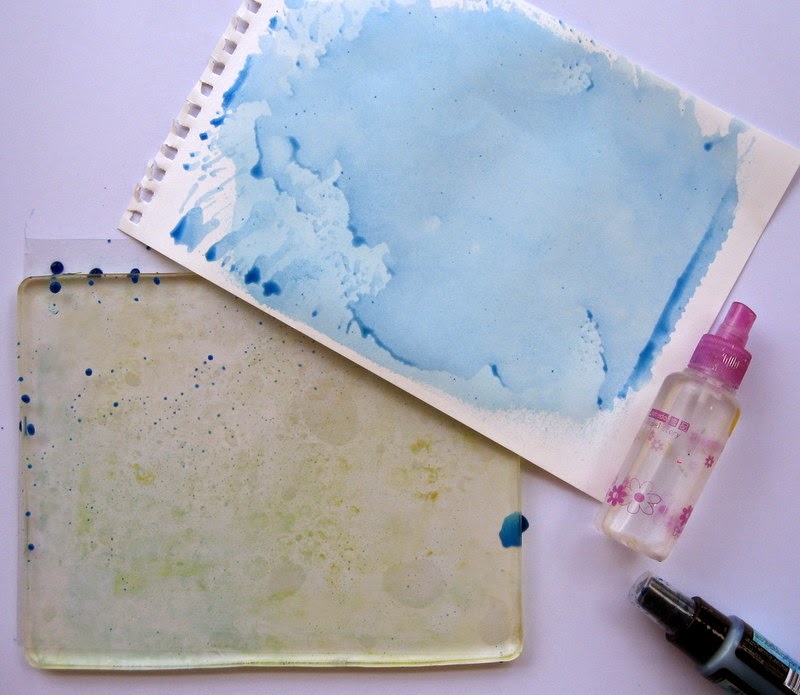
I am using Ink Sprays today. I spritzed light blue ink (Lindy's Starburst ) all over Gelli plate, spritzed some water as well and  took a print on watercolor paper. Watercolor papers are good for this technique.


 Here, you will see I spritzed dark blue ink and took the print on same paper.


I am not wasting any ink, my second paper is getting ready with Ghost printing.


In these pics , you will observe, I've spritzed the ink only at the edges of  Gelli plate. I've used brown ink here,as I am making vintage paper. 
You will ask me- why am I taking separate prints on same paper, why don't I mix the colors?
Becoz' I am building the layers and later all will be visible to show up as a color texture!!


One more layer with golden brown Lindy's spray!


Now we have got two Gelli printed papers.
And I've used these to make my Journal page


I've used one Gelli printed paper as a background..for some more layers I've done stenciling with Tim's Layering stencils and newest Cracked Pistachio Distress ink.
Text at the edges are with Heidi Swapp Mixed Media stamp... my new favourite one !!

I've stamped Eiffel tower, Fleur de Lis, Ephemera text on second Gelli Printed paper.
Flowers are die cut from our Gelli printed paper with Tim's tattered flower die.

Hope you are liking this Gelli Plate Printing Series at Colour conception Challenges.

Thanks so much for stopping by today.


Monday, 23 February 2015

Gelli print plate and Dry Embossing

Hello Everyone, 
Shilpa here, 
I am continuing the journey with Gelli plate and sharing today's project with you,  it is a Mixed Media Canvas.


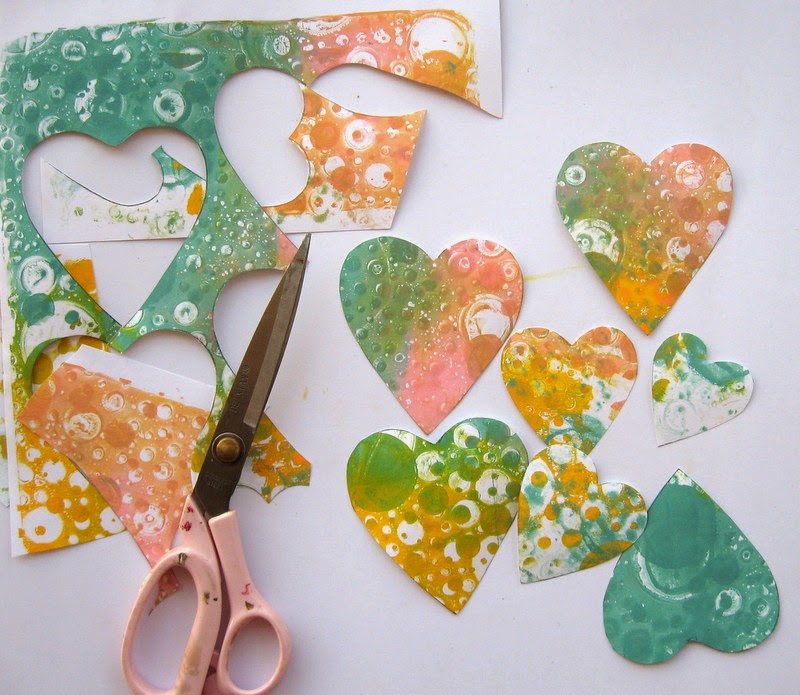
Have you noticed wonderful hearts ...yes I've made them with my Gelli plate.
Let's see the process.


I used Distress paints- Worn Lipstick, Evergreen Bough and Hobby Ideas Golden yellow color for this. As you will see I have just taken few drops from each bottle.


I used my Brayer and rolled it on Gelli plate. I did not mix the colors a lot.


I kept Prima Bubble stencil (12*12) onto Gelli plate, kept the paper on it , burnished it with my hands and got this fab print. I did not want to stop there, as I had some more paint on my Gelli Plate.


I took out this print on same paper, after removing Bubble stencil from Gelli plate...ohh I am loving this.


I decided to use my Gelli plate print as a embellishment. I could cut out so many hearts with one print ...fun ..fun!


 I wanted to bring texture on these hearts (my regular blog readers know my obsession with all kinds of texture) I put the hearts in embossing folder ...and I got textured hearts with layers of colors.
Do you like it?


Thanks so much for stopping by today.....always looking forward to read your feedback.
Stay tuned for my next post in this Gelli plate printing series.


Friday, 20 February 2015

Playtime with Gelli Plate

Hello Everyone,
Shilpa here from 'Neon Diary' blog.
And I'll be sharing with you some of my fun experience and projects with Gelli plate. The Craft Shop has introduced Gelli Plate for the first time in India. And this is my newest toy for print making and mixed media.
Gelli plate is new to me, and I would like to share my experience, tips and tricks over the coming days.

So lets get started..

What is Gelli plate?
Gel Printing Plate looks and feels like gelatin, but is durable, reusable  It's easy to clean and always ready for printing. Monoprinting on a Gelli plate is simple and fun. The prints are too cool!

Which material we need to start with?


We will need Gelli plate, Brayer and some acrylic paints.

Open the package....


Gelli plate is covered with thin protecting plastic sheet from both sides, so I remove from one side and keep for other side to protect the surface.


I poured 2-3 drops of Pink acrylic paint and started rolling Brayer, wow! surface is smooth and yummy!! 


To get even coverage of paint , you need to press the brayer lightly.
Next we have to add texture..


I stamped with my home made foam stamps randomly on Gelli plate and now  its a time to get the print on paper.


  I just put the paper on Gelli plate and burnished with my hand. Removed it.....Voila...I got this lovely print in minutes.


Here, you will see I used my stencils to get texture. 
I applied color on Gelli plate, kept the stencil on it took the positive print on one paper and removed stencil and took negative print on another paper. I've used 3 colors and 3 stencils.

Some tips:
Keep your back plastic protecting sheet intact while playing with Gelli plate and colors.
Use light pressure with your Brayer to spread the color
Use fluid acrylic paints, instead of thick ones.. ( or use bit of water in your thick paints)
For better results use little bit thicker paper than copy paper for printing. (copy paper works as well)
Clean the Gelli Plate after use with baby wipe.

 
And with one of  that fabulous background I made a card...!!


When background is ready, it took me another 5 minutes to assemble the card. 
And I am very happy with this...
When you are in hurry....and have to make multiple cards..get the Gelli plate print, cut them to suitable sizes, put some diecuts and embellishments... and they are ready!!

Hope you liked my tutorial/ information here. I'll be coming with more techniques....
Let me know your feedback and questions, I'll try to get the answers for you
so join the journey with your own Gelli plate.

Grab your Gelli Plate today..they are available  in different sizes at The Craft Shop.


Thursday, 7 August 2014

Sospeso Transparente - Tutorial by GDT Daksha Poppat

Hi People,
We do hear a lot from you - how you miss our challenges!! And the good news is here! We will be back soon!! So, till that time, we want to engage you with something new and interesting!
     Our GDT this month!! She is one versatile crafter,who can shift to any style easily and weave magic in all those styles! Not only paper crafts, she is too good in other crafts too!! You have to got to see her works to realise what I say.. So , without much rambling, here comes the tute from Daksha!!   
SOSPESO TRASPARENTE TUTORIAL...........:
Sospeso trasparente means transparent and raised process. By applying the image of a single layer of paper or tissue towel on the thermoformable sheet, it is possible to obtain 3-dimensional creations, and it gives a very realistic effect.
Things Required:


https://blogger.googleusercontent.com/img/b/R29vZ2xl/AVvXsEiHHy7RxRKP3NkEZ5-vwDtFJNxd6RkEEMPCJJpwXVWOsUT3RzYRXZykJuo_Ubui2LQbWKcsXWo98gxwgb1fR-K2dBORkkW8rAAKm8FSQVB2wVhyphenhyphen8Lq51UE2sw6_iaEBYqbU9rySzrqCkJMh/s1600/souspeso+023.jpg


* Thermoformable plastic sheets : Its a special thermoplastic material whose chemical formula has been specially designed for this technique.This film is made with very high quality polymers and easily malleable at low temperature. available both in trasparent and white.
* Embossing Pad: It's a latex sponge with high density and thickness which is perfect for this technique
* Wood graving tools/Burrins: It's got 4 round tips of different sizes to shape the film.
* Sospeso glue: It is specially designed for the use with this technique. It's perfect for pasting on the thermoformable plastic sheet either thick, thin paper or fabric or tissue napkins.
* Candle,scissors,glitter balls,sponges,brushes,tweezer,printed films...
* Main object which you want to decorate..here ..I have altered a whisky glass into decorative LED CANDLE  DISPLAY.
STEP:1
Choose a design from paper veil (use only the printed one). Pick white or the transparent thermoformable film depending upon the effect you want.


https://blogger.googleusercontent.com/img/b/R29vZ2xl/AVvXsEjPvOjocomF6RW_qSW45JQsTlBSsBWcjvRu4YUdeyAPu3h7N8mdNCd9pjdiRDYcgkpIRRBoQMD9GheKOLsjrZ7Mvabr57p4eQ9Qns-Ep82PYbZiBIRZztmXNc_vZTeCMZL7PdGGAjBDlGBa/s1600/souspeso+024.jpg


STEP: 2
Dilute the special glue with a few drops of water in a glass plate then spread a very thin layer of this glue on the thermplastic sheet and paste your printed cutout design facing down.With the help of glue & brush try to remove all air bubbles from the bottom and make it as flat & smooth as possible.


https://blogger.googleusercontent.com/img/b/R29vZ2xl/AVvXsEiSUl7BR_DOyGwDa2DMqcJw_g_wQ4F10XxAN2XHSK_C5zv989BvVrcYFzCbGLFvpjmneVMerozXkXSjPwnwSw9IRnrTpTK-sLDZnNvID9bJKm7M4iAK33j3oMwiQKrPD49hR_XmnqdxrlUM/s1600/souspeso+030.jpg 
STEP:3
At this stage either you leave  your design to dry naturally or you can speedup your drying process by using hair dryer.


https://blogger.googleusercontent.com/img/b/R29vZ2xl/AVvXsEhnSVJl1PQGF7Jpxc4TVDGMEBmkANCNjopUaXHvVr93nw1ah_oDCG0gS3ziplke5oYBgh_-0useuKRiSuBt-vdCfFu95KoM_djQPGgyA4T5-IeoCy-Sj7QmnCcQdrqYd9ncPPHXUiPlLshG/s1600/souspeso+033.jpg


STEP:4
when it dries ,cut out carefully the border of the images ( example here flowers),separating the petals without detaching them.


https://blogger.googleusercontent.com/img/b/R29vZ2xl/AVvXsEititX1_jVx-CMOqUdWIExUTtD6ktpipj8Jmh6SmPX7Bn5iu5uCoTlL_XJz0MR2tmxvRQ-QMtsICqsWeIZHy0S41WBvKU7D3Dc4f5FckTSlehl_TWHqpyqCkNw6OwwDvGnpwSfIIga-eNpj/s1600/20140731_121429.jpg


https://blogger.googleusercontent.com/img/b/R29vZ2xl/AVvXsEizcrAsUfeYNS5tyaDnwleAmDBisVXoRzGNsWkOKnJ9IEQ4QiA0pWVI3wpXixLdb4lJ8Wr-7HcYkvoHIpnWL_OT7FkBnCXJ34lOULZBgqnUurDRFqoze31wJVPKI7posaF4oZTS2MaQqCCk/s1600/20140731_122540.jpg

https://blogger.googleusercontent.com/img/b/R29vZ2xl/AVvXsEiNez5GDs7dfDgc-HEnBW7_deVdJqWzqOuf0V8UN9eNJ7OfHRigB83I4LgdsGAFfLCUHAuw-CVKKGpkegRtl8SPcNa0xwUv4YgYlLxpT0o0BB56Op_Atic035YwgS5xQo8VJbNQCEpbqVPP/s1600/20140731_123426.jpg


STEP :5
Usimg the basic sospeso tools ,start modelling the different petals . Keep  flame at a distance of 1-2cm and heat the thermoplastic design (here flowers)for a few seconds and small portion at a time .Give shape to your flowers or object.There is no front or reverse side ,depending on your design,you have to work both sides

https://blogger.googleusercontent.com/img/b/R29vZ2xl/AVvXsEjZjYEqz2Mb3dqaanI4ntX_Yimjz1ktWRo1NZNXzki1KVkop5kVp0vrkaf-b6KfLpw6wytYT08YIJYcdvce1frYIz0ha82zpLUC-PU3BcuVV7r8HK8aCXkfvkV0Wp-6sIxEc5kzDJGuFQnw/s1600/20140731_124340.jpg

https://blogger.googleusercontent.com/img/b/R29vZ2xl/AVvXsEjlP27xZqr70mmvDPodbijZjNaPoJoKO6K3sxCa4pJnfis9k9YOyPETHb-oYCFogWnF3tUHKbN5yQqgX5pXowVsZHjVtbHtZBVeK7RD4ntzGX8nE5vgYJh5hqAj-C7GK5F6-mOgclQo8uv7/s1600/20140731_125542.jpg


https://blogger.googleusercontent.com/img/b/R29vZ2xl/AVvXsEi43HJb8vXxqPGpurlB3JJO8xNpxUKrZW3Laf78RQtcP4tE2WNZBPSgz_8ric1mGV8R4WyRswIaxVdMgav0PMZ0ShAVYWhHkkbVumsCvfsuYjGjHqBo4gqTZhR3BG6LoJtR-7IFuGTMblgC/s1600/20140731_130242.jpg


STEP:6
To give 3D look to your object (here flowers) I have taken 2 to 3 layers of flowers,which I have embossed individually and then I have glued to the main flowers to give 3 dimensional look .I have used hot glue gun to attach each layer of flowers.


https://blogger.googleusercontent.com/img/b/R29vZ2xl/AVvXsEglqs9OhVnzZ7IegxEAUGGppUboqVSp2oaFKfQnKADWbifFLhpzbTdsmrXXMfGLrZaXYwjlU3BmVLg6Wda0_lw38KacQkOoBju6DgQC8IAAWy8owNokn5HDzVj7fF5UvqIJStdfpGvH-r_t/s1600/20140731_130207.jpg


     In the center of each flower you can use glitter balls with the help of glossy accents or hot glue gun.
https://blogger.googleusercontent.com/img/b/R29vZ2xl/AVvXsEjfJj6uT3Ewc65yPNP88UCwXkkQ8DXicQaXqyV0RxrTHZHSTgXq5R3t0_AeIOtro6vVJyyFrAXkCZ-s21zXr7W58-ix33Pka3Ih3pwPP59IKwKbIZRfiF97Mk01r2zx1ijbPC-MT-BYKe8b/s1600/20140731_131621.jpg


STEP:7
Now your sospeso object is ready .You can use this 3D flowers on your object in multiple ways.You can use this to decorate your trays, boxes,glass objects,clocks and list is endless...


Here I have used complementery whisky glasses ...with company  logo on it. I have altered that  into DECORATIVE LED CANDLE DISPLAY...


 First I have covered the glass with jute cord tightly  till required height. If required you can use fevicol at this stage .Then I gave a coat of gesso and dried with hair dryer.Then I gave a coat of white acrylic paint and dried with dryer to speed up my drying process. At this stage if you like natuaral colour of cord you can leave as it is...don't need to paint.I removed all white traces of gesso and acrylic colour from glass by scrubbing with wet cloth.
https://blogger.googleusercontent.com/img/b/R29vZ2xl/AVvXsEhfL0r3RWPFJZAAkgtXtWMAT0fxEZrRWlsIB3alxokfTbrbYH8cZxuhlcKefY-bFd-f5ACncDQwG_CzIe0Kl6_NbpQvIfLjMRAOQFEeJyRR9dfO28XreUx6o9GgqwX0M5AOxWL2OXoUNTre/s1600/20140731_132236.jpg


https://blogger.googleusercontent.com/img/b/R29vZ2xl/AVvXsEgNb0l5OKUtLN4LTE8g4ys8FPkOnb_YNDdumHN0eo0xUavw8WaKkZ1BNKu3xUCVJiBH55DvBrzABpKY5nPoHlW71JxbYEDZMVXREoVhkgHQVVAGNZqBY35jaS44mZ-e9lSICFF3OYCquX6O/s1600/20140731_132332.jpg


https://blogger.googleusercontent.com/img/b/R29vZ2xl/AVvXsEiRulVOwZoP_1bm4SLw4V0EDolr57a50T8K70kbmGY16BkQrDa7wnN0YGKVDWSNU450nWaJttmFZYBVdzEsZHoBsdB2w_P7PTnp4qX6lQHcQtsXpJaOhPu_RGMOrxtC51N5r4nhKS1hdXp-/s1600/20140731_134302.jpg


https://blogger.googleusercontent.com/img/b/R29vZ2xl/AVvXsEgK9zkj7Wwta1tIy_D2PuD9rCUbT7RhR9YZDMDWNUykM6-QZDT3FvjaWrF62zoXGCfpA4s-1evpu70OiOIISTid4uEnv5Kr5B_hiFcjp3T3pHU4bxoeEs-M9UwfrNMb71aYkxXuKmhXTEHx/s1600/20140731_134408.jpg


       Finally I have decorated my glass with sospeso transparente flowers using hot glue gun.To highlight more I have used pearl stickers....Once its ready you can put colorful led candle inside your glass..It  looks very pretty and various changing colors of led lights make your glass more attractive...piece of display.
  Hope you will find this tutorial easy to follow and interesting ..This is my first tutorial so please excuse my mistakes...if any....thank you.
LOVE
DAKSHA POPAT

Wow Daksha, Thanks for such a detailed tutorial!! And one more thanks for accepting my invitation immediately. We have all the items for Sospeso in stock!! Chk website for more -  http://www.thecraftshop.in/5071-sospeso-transparente

Thank you Ladies..See you soon!!


Copyright © 2015 The Craft Shop
| Distributed By Gooyaabi Templates