Featured

Wednesday 31 July 2013

Challenge # 3: Nail it Down with Textures

Hello All....

I cant believe its already been two months since we started this challenge blog and now we are entering our third month.....wooow...thanks to all the people who have supported and participated in making us a success! You all have showered us with some beautiful entries for our last challenge and the winner announcement shall soon follow...

Today, I bring to you one of my favourite and most loveable topics "textures"....as our this month's challenge...

Nail it Down with Textures


Let me make the theme more clear for you. We are looking at any kind and all sorts of textures that you can create with the help of embossing folders, with the use of fabrics like laces, burlaps, mesh, net or with the use of mixed media paraphernalia like gesso, gel mediums, texture paste, utee, embossing powders, sprays etc. The more the textures the better! The only condition is that whatever method you choose to incorporate, the projects need to be something that you can hang on your doors or walls- like a key chain hanger, name plate, wall hanging, scrapbook layouts, wall clocks, fridge magnets and so on....


The Craft Shop has a whole range of embossing folders and mixed media raw materials which are fast selling out....so grab your favourite item till the stock lasts!!!! We shall be discussing a lot of those raw materials in our future posts so stay tuned!!

To participate, please ensure, you follow the below rules

  • Be a follower of our blog
  • Link fresh new entries only. Back dates entries are not allowed.
  • Link to the challenge should have the url of the specific post and not to your blog.
  • Link back to our challenge...i.e Place the url of this post in the post you make with your project to enter this challenge.
  • Leave a comment below after linking.
  • You could participate in a maximum of 5 challenges including this.
  • Maximum of THREE entries per person, please add (2) or  (3) for your second and third entry against your name.
  • Lastly please remove word verification from your blog to help our DT leave comments easily.

The TOP 3 entries will receive a Challenge Winner Badge and one of them would be honoured as a GUEST DESIGNER for our next challenge.

One random winner from the participants would receive a GIFT VOUCHER worth Rs 500, to purchase in our shop - www.thecraftshop.in


Our Conceptualists have done some really fabulous work to inspire you for this challenge.

Rajni Chawla calls this project "One Perfect Day" as this photograph has captured a moment that has gone forever....but will always remain alive in her heart.

The background texture is made with Studio Multi Medium, Distress paints and Lyndy's sprays. Sentiments are from Forever Memories Technique stamp set. Birds are stamped and embossed with UTEE. Flowers are stamped and die cut with Sun Kissed Fluer die using Ranger distress inks.


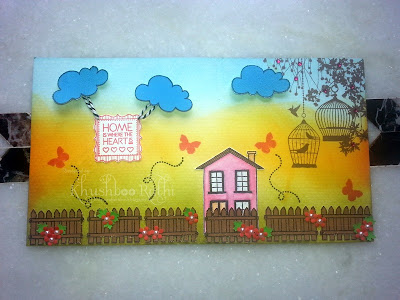
Khusboo Rathi created a cute wall hanging using Crackle paints, Kaisercraft Humming Bird Stamp set, Bakers twine, Spiced marmalade distress ink, Hero arts pale tomato mid-tone shadow ink.


Tanvi Shah as created some wonderful textures with distress inks, versa mark ink pad, UTEE, mulberry roses, TCW stencils.


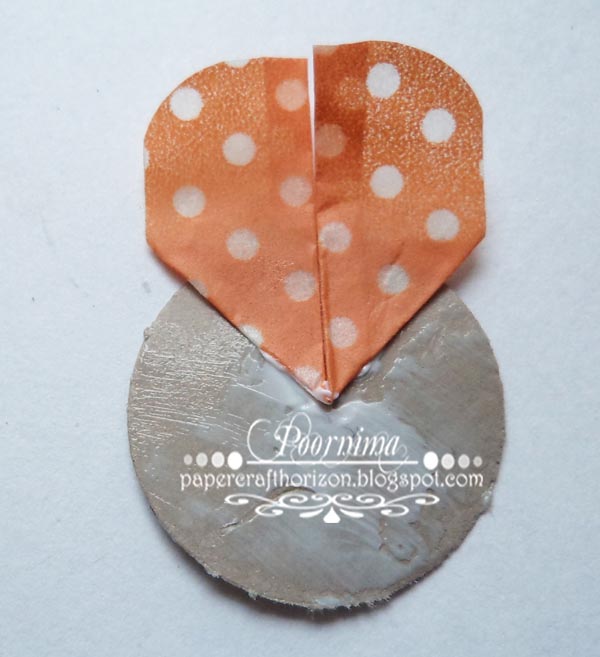
This soft and beautiful textured wall hanging uses only embossing folders made by Poornima Jain....


Priya Sivaraj

This beautiful MDF wall hanging uses Laces for textures. Supplies used Prima Lyric paper pad, 75 cents die cuts, Fabscraps bird cage, Darice Miniature mailbox, Darice Miniature clock, Distress inks old paper and Vintage photo and Roses


And lastly myself, I have used Studio Multimedia Gel Medium, Liquitex Modelling Paste, Mft Film strip die, Clearly Besotted rack of books and note card stamps, Memento Fireworks sprays, Hero Arts Soft Blossom shadow inks.


Now with so much oozing ideas rush to your crafty table and start up your project to join our challenge....


Happy Crafting
Saumya

Sunday 28 July 2013

Basics of card making 101

hello all you lovely people,

Have you been enjoying reading the very knowledgeable posts being shared by the very talented DT we have here at color conceptions and learning new tips.. I know I am...

My post today is for all the people who are making a foray into paper crafting or have just begun... I am sure each one of us wonder that what are the basics tools one needs to have to begin your journey as a paper crafter... I have a compiled a list of the things I think are more important..

All pictures are from Google... WHY? Because my entry into the craft room is banned for sometime.. Reason.. Probably later

My progress into paper crafting has taught me to always research before taking the plunge into buying anything and to find suitable alternatives inside the house... The list I am compiling is not the gospel truth and may vary from person to person.

The first thing is to have a good pair of scissors. It is very vital to try out a few before you narrow down your choices. You need fine sharp scissors for fussy cutting your stamped images and a separate one for cutting your ribbons. Do not use the scissors you use for cutting paper for cutting your ribbon, it would give you frayed edges. Now I have been using a fiskars one, some locally purchased ones and more recently a scissors bought by my SIL from Japan.. Cuts like butter and is so so smooth.. I have a wishlist in this.. The Tim Holtz Tonic Scissors... It is supposed to be a must have for crafters for glue never sticks on it..

my fiskars scissors looks something like this


This one looks something like the one I got from Japan

The next vital thing is a self-healing mat. Look around, you might find one at your local stationary store. Keep the biggest size for use as it proves to be a good working platform. The self healing mat is important when cutting images to exact size. It prevents scratches from appeal on your floor or the surface you are working on.
 I have the same one

Well since we spoke about the self-healing mat, a good cutting knife is also very important. There are a wide range of branded cutting knives available in the market but I still use the camlin one. Am in the lookout for a camlin precision knife( In case any of you can get one for me I would be overjoyed).

exact replica of the one I have


Then come your staples, a fine tip pencil, a metal edged ruler, eraser and sharpener. I specifically mentioned a metal edged ruler as it does not get frayed with usage over time and is precise as wearing out is difficult.

Black fine tip marker, a fine tip black and white gel pen. The marker is to help you run away images which have not been stamped properly and the fine tip black and white gel pen to make faux stitch lines ( adds an extra Oomph factor to your projects) I use the signo white gel pen and a 0.3mm tip black marker which i got locally.


A bone folder is very essential to give your cards the very crisp line. If you are a special fold addict like me then a bone folder can be a life saver. Gives you good impression and makes folding so much easier.


Besides these essentials my most favorite and important tool is a good paper trimmer. If you are clumsy like me and hate fine cutting then a good trimmer is the answer to all your prayers. You are spoiled for choice with the different types of trimmer available from various international brands.


Good choice of glue is vital to make a project outstanding from average. There are a lot of local choices available for us in India along with some good international brands like TomBow which is available in the store. You also need to keep some double-sided tissue tape and foam dimensional adhesive; they come in handy while crafting to add some depth to your projects.


So here is my list of must have tools. In case I have missed out on anything Leave me a comment and I will keep updating this post. Will share pics as soon as my internet is back along with my PC. I do not feel too comfortable working on my nephew's PC and I have no pictures to share here.

You have a few more days to play along with the second at color conceptions Trash to Treasure with Washi!

See you soon. Till then, Happy crafting!

Hugs,
Khush


Wednesday 24 July 2013

Getting more addicted with washi....!!!

Hello friends !!

What ie addiction ??

"When you can stop you don't want to, and when you want to stop, you can't...”


I am addicted to flowers....and now getting addicted to Washi Tapes.My collection of Washi Tapes is increasing day by day and so is my addiction of making flowers.Two months back I was totally new and din't even knew how and where to use them. And today i am here again with my new post to show u what I created with these super addictive colorful tapes.

Hope I inspire u in creating something new today.


Here is the tutorial for you...
Supplies needed...

a. Washi tapes
b. 26 gauge floral wire
c. Green or brown floral tape
d. Strong thread
e. Flower stamens /small glass beads


Sandwich the wire between washi tape as shown and shape it like a petal.Press it firmly.You will need 5 to 6 petals for single flower.But I some times make my flowers with 2 or 3 petals also. I don't restrict myself to size and no. of petals. It should be eye pleasing ....thats it!!
Simply twist the petals to make it look more natural.For stamens u can use either ready stamens or small glass beads.For beaded stamens fill one fourth of floral wire with small white glass beads,Make a small loop with beads leaving 4 inches of bare wire on starting end (for holding) and make a twist. Repeat the same process with next two loops.Bring the remaining wire down and trim rest of the extra wire.Hold one petal around the stamens and tie with a strong thread.Tie rest of the petals one by one forming a flower giving a tight knot between each petal.Wrap it with floral tape.

You can arrange a bunch with 2 or more flowers according to your needs.Add some leaves,spirals or ribbons if of you want.


How is this???


this...????


and this...???


and this...???


Aren't they pretty?

all  are the results of my addiction to Washi's now !!Here is the tutorial for these....I know you would definitely want to try these.


The above three are the same made with different sizes of flower template but the yellow one is with same size template. For  making these  you can use any 5 petal flower die or you can even use any retro flower template. I could have used punch but I din't preferred taking any risk for my such expensive craft supplies.This way even I can improve my speed of cutting .Lolzz!!


For these prepare a card stock of any light color by sticking washi tapes of your choice. Fussy cut or die cut and pinch all the petals at the tips as you like. You can cut 2 or 3 different sizes if you want. Form a flower by layering different sizes or same size holding with a brad in the center.Here is a video tutorial for your reference.


Just a little embossing and you can give a new look to your flower. Here I did one for you.


In the above flower I have embossed each petal from the back using my ball tool and perforating pad. I think most of all the crafters know how to simply emboss the petals with ball tool.Still here is the video of few simple techniques of making flowers with a punch or  a template for all freshers.


Now on to my another addiction.....addiction of buying new craft supplies.The more I promise myself not to buy,the more I buy!!
Cant't resist you know.Is this the same with you also??

I specially opened my new bottle of UTEE  for washi....was very scared about the results.Though I had my melt art supplies with me since long....but tried using it for the first time.Look at the results I got.. 


Look at the side view...
How yummy these are !!!


My daughter was asking for one few days back and she got two. Lucky hun !!
Here is the tutorial for those who have pretty daughters like me.


Ink your cut outs with versamark ink. Sprinkle Ultra thick embossing powder and shake off excess of it. Hold the cut out with foreceps and melt it using your heat gun. Repeat the process and keep adding layers of UTEE until you get the desired look. Simply shape them when little warm. Assemble both the layers with a brad in the center and made rings by gluing them on quilled creations jewellery rings glossy accents. Don't forget to seal the back of the flower with mod podge to make it wash proof. You can also use these flowers as embellishments for your projects.

  
So...how did you like my addictions.

Am I wrong if I am getting addicted to these beautiful tapes....???

Am I wrong if I am more into buying ??

actually.....I love both  :)

Getting addicted to some product and creating something new every time u sit n work is the best thing every crafter should have.These sweet little addictions keep us growing every day.So if you are also addicted to buying.......just log on to our website. The Craft Shop has added a huge range of Washi Tapes at a very reasonable prices for you. All the products used in my above projects are available at our store. Shop a lot and share a lot and...win a lot!! I mean do take part in our on going Challenge 2 Trash to Treasure using Washi Tapes 


Thanks to those who have already participated with their beautiful entries.


Bye for now till I come up with something new with my another addiction.Till then have fun with crafting !!

((Hugs))

Rajni chawla

Saturday 20 July 2013

DIY Washi Tape Embellishments and Cake Toppers

Hello Lovely People,

This month we are featuring the famous Washi Tapes. The tapes are really irresistible specially when the prices are so economic as in Craft Shop. Once you start using it, you will always want to have more in your stash. I think for making quick projects nothing beats Washi Tapes. You must have seen awesome inspirations from our DTs and Guest Designer. And today I will showcase the use of washi tapes in making embellishments and cake toppers. Before that, I want to share a recycled sweet box.  Here’s the recycled box-


The tile pattern on the top is made using two washi tapes. I love to add ruffled ribbons in my project but always struggled making them. But you know what, this is now the most easiest thing I have ever done. Thanks to Washi !! Lets see how I made it -

Washi Tape Ruffled Ribbon - 
Take a piece of ribbon ( mine is satin ) and Washi Tape. Adhere washi to the entire length of the ribbon.


 Start pleating it and continue doing it till you reaches the end.


Add washi over upper portion of the ruffled ribbon to secure the pleats. And thats it. You are done !!


Oh wow look at final result. Since washi tapes are reusable you can use this ruffled ribbon on any other project.


Washi Tape Flower Embellishment -
Washi Tapes can be used to make pretty flower embellishment. This is one I made and used on my recycled matchbox. Complete picture here.This flower came out when I was experimenting with these cute washi tapes as part of my DT project. And I thought to share a tutorial with you all. Below is the tutorial on how it can be made.


Take a piece of a washi tape and fold it as shown. Length depends how big you want your flower to be.I have taken 2" tape. It will end up in a large flower. The one that I used on matchbox is smaller.


Find the centre and fold half part

Fold the remaining half too. 

Now fold as shown and round the edges with scissor and then unfold. A petal is ready


Make four such petals


Punch out a circle and stick all four petals


Now give slits in cardstock with scissor so that you can lift up the petals. This is optional


This picture shows how backside will look after giving slits


 Embellish the center. Here's my flower -


Washi Tape Cake Toppers -
(1)Toppers for Children Parties - I have tried some super cute cake toppers which are so quick and easy to make. These are perfect for kids parties. 

Die cut  or punch our a circle. Add about 1" washi tape on both sides of circle to make ears.


Give a round shape using your scissor


Take 2 pieces of 1"  and 2 pieces of 1.5" washi tape. Fold all pieces lengthwise and give a round shape at one end. These will form legs and hands.


Cut a piece of about 11/4" washi tape and stick it the circle with a toothpick in center


Add hands and legs

 Add another piece of washi over toothpick


To make trunk, cut a piece of tape and fold it lengthwise leaving a small portion at the top.


Stick the trunk on the face as shown. Add eyes to complete it.


These are finished ones-


Added a small washi tape bow in it


(2) Washi Tape Flag Topper-
Take a  piece 4" of Washi Tape. Stick a piece of wire on sticky side of tape from center.


Fold it over -

 
Add a toothpick at closed end and wrap the tape. On open end cut a triangle.


 Now shape the flag as you like


(3) Washi Tape Rosette -
Take a piece of 8" by 0.5 " paper. Add your favorite washi.


Score at every 1/4" interval

Accordion fold it


Join the two ends. Punch out 1" circle and adhere rosette to it. You can use it as embellishment for cards or add a toothpick to make it a cake topper.


Tip - You can use border punch on outer edge before scoring to add some cool design.

Finished one-


Hope you like these washi tape tutorial. Would love to hear from you. And don't forget to participate in our current challenge -"Trash to Treasure using Washi Tapes". Hurry up , just few days left. Till then,

Have Fun Crafting !!
Poornima


Copyright © 2015 The Craft Shop
| Distributed By Gooyaabi Templates