Featured

Sunday 22 September 2013

Brayer Techniques


Hello!!
This is Tanvi here, with my inspiration for this month's theme - Spread your wings with distress inks
My team feels extremely satisfied to see you all inspired by our posts..............................this in turn inspires us to bring the best in every post !! The blog has already crossed 100 followers so stay tuned for some announcements coming your way.
Now onto today's post which is all about brayers & these are now available at THE CRAFT SHOP & so are all the supplies used here at very economical rates.

BRAYER is a type of roller that can be used as an ink applicator to spread the ink evenly across a large surface.
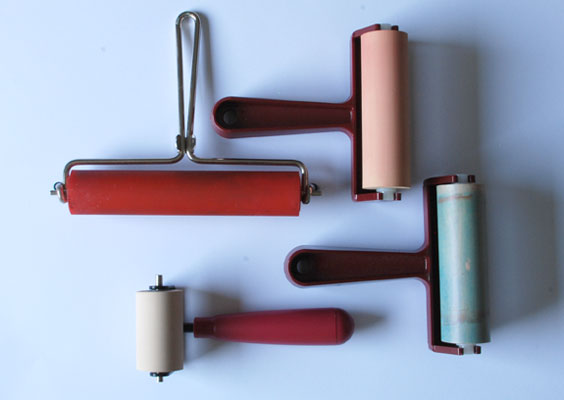
brayers
Google image

It has a handle and interchangable rollers. A soft rubber brayer is the best type to use with inkpads. 

TYPES OF INKPADS
Any type of inkpad can be used, best results are with water based dye inks. Stunning backgrounds can be created with rainbow inkpads in a jiffy.

TYPE OF PAPER
For best results use glossy card stock. But remember the color will look darker initially & fades as the ink dries.

USING THE BRAYER

1. Roll the brayer over a stamp pad in one direction, lift and roll again in the same direction. Repeat until the roller is fully inked. Do not roll back and forth on the pad - this results in inking only a part of the surface.
2. After the brayer is inked, roll it on the paper or card. Roll the brayer back and forth, lift & repeat over your project & change the direction so that the colors blend, re-ink as required.

CLEANING
The brayer can be easily cleaned by rinsing it under running water and wiping dry with a paper towel. Stubborn stains will require alcohol or stamp cleaners.


TECHNIQUES

  1. The background you see here is created with distress inks. Load the ink pad with mustard seed as described above - ROLL & LIFT & ROLL followed by step 2. After you are satisfied use the other color over this - spiced marmalade.The lower part of the tag was masked with a torn paper & later I used peeled paint & mowed lawn. Once the BG is ready use stamps of your choice. 


    2. This is a resist technique also referred to as ghosting,  with versmark ink. Stamp the image, do not heat emboss but ink the brayer & roll over it. Observe the stamped image appear like magic as the brayer spreads the ink!


    3. The next tag is created with a technique called Josephs Coat - this is essentially the same technique as above with an additional step of first coating the card stock in a bright colored ink (picked rasberry) & then stamping the image in versamark (the image can then be heat embossed in clear powder). Load the brayer in black soot & layer over the stamped image. Use a dry tissue to wipe off the excess top coat & voila, see the hidden image brighter & sharper.


4. Look at these amazing effects obtained by rolling a brayer over dry embossed card stock.


Another tag which is embossed but this time I loaded the brayer with glitter glue & then rolled it over the embossed surface.


A closer look at the glittery sparkly result. I love this!!


5.  Another interesting use of the brayer is to create interesting backgrounds like this one, can you guess what I have used here???? 


Yes tied a number of rubber bands on the brayer & roll it over as you please. One can try using bubble wrap, cheese cloth, mesh, lace, burlap, tulle or you can even use markers to draw patterns on the brayer & then transfer on the cardstock.

6. And finally a very interesting technique - mirror imaging / reflection. This allows to stamp a reverse image & create interesting a reflection of the image. 

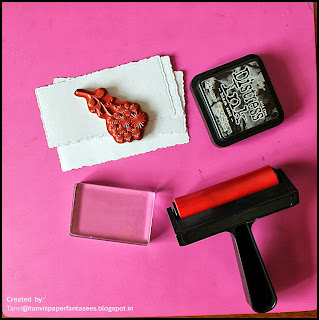
These are the supplies you will need. 


Ink your stamp & use a clean brayer to roll over the inked image, this will tranfer the image on the brayer as shown below.


Next roll the brayer on the cardstock I have done it at the bottom to obtain a reverse image which as desired will be lighter as it is the reflection. TIP - Stamp the reflection first so that it is easier to position the  actual image later.


Ink the stamp once again & carefully position it & stamp..........there you have a mirror image. This technique is often used to create landscapes along a water body to show reflection in water.


So you can see the brayer can be used to create numerous backgrounds & textures for your creative projects. Use a single color for a solid BG or many colors for a multicolored BG. Remember you need a bit of practice using this versatile tool but once you nail the technique sky is the limit & you can make your own unique BGs.

Thank you for joining me today & do participate in our challenge this month. Awaiting your feedback!!!!


Sunday 15 September 2013

Let's go super inky with flowers !!

Hello lovely ladies..

 I'm Rajni here,with few more inspirations for this month's challenge Spread your wings with distress inks.  Before I proceed further with another detailed post of mine...I would love to feature a fellow crafter, Nupur Priya on our blog, who shared few of her wonderful creations with us after taking inspiration from our blog post. She tried her hands on the techniques the same very day we made our post. If you missed watching her creations on fb....you can click here .
Here are few of her amzing creations.


Watching a video can be helpful, but the only way to master any technique is to start doing it!!!

Very well done Nupur!!!
we are really happy to see that we are able to inspire you.


Now on to Today's inspiration.

With every project it seems that I am getting more and more fascinated by flowers and their beauty. I just love to recreate those petals, those pollens, and those stems, all with my tools and craft materials. It’s like recreating god’s creation. Of course you cannot better him, but you can at least compliment his creation with yours. The petals of my flowers might not smell but can beautify my projects and give satisfaction to the core of my heart and mind :)

Making handmade flowers for scrap booking, card making, and other paper crafting projects saves money and allows you to customize your embellishments to fit the style and colors of your papers. There are many, many ways to use and create flowers for your paper crafting projects. You can use your punches,dies or u can fussy cut or fold and create variety of flowers. Today my focus will be on making flower embellishments.

You must all be wondering what all I have in my treasure box today.

Flowers and my favorite distress inks!!
My this post on CCC blog is again a part of my giveaway also in which I will be sharing videos of handmade flowers which I myself followed while learning. Few of my fellow crafters insisted me to post my own tutorials....but clicking step by step pictures and making my own videos tutorials is not my cup of tea. Since there are so many wonderful tutorials already on net I don't even feel like making another copy of it....moreover I want to give credit to the original creator. If anyway by chance I get to create something that is 100 percent original of mine....I will definitely give a try on making one and share with you all.  I'm still in process of learning through so many already existing blogs and videos and must say I'm enjoying every bit of it.Magic Water Color Technique Check the video here by Jessica Taylor. She is using ink refills but you can use regular distress inks by pressing your ink pad directly on the acrylic block and splinting little water with mini misters. 

You saw Jessica used white paper and a single color to color her flower where as I followed the same technique but again.....with a small twist. I don't know why I always try to something different what i see. I have used colored paper and instead of one i took two shades of distress inks.


Now on to my 3D paper flowers. You can make flowers with punches n dies and sometimes    give shape by hand cutting. I got lots of queries about how I give crumbled look to my flowers. Today I will be sharing two of my favorite tutorial for making crumbled flowers.

Crumbled paper gardenias tutorial by Luvleescrappin
Paper blossom bloeman tutorial for assembling the paper flower


Do you want to have a look what I created after following this tutorial ??
Here is it.. 


I loved this...used this shade for the first time.....Seedless Preserves Distress Ink,Spellbinders Rose Creation Die Set and Heartfelt Creations Classic Leaf die.
Take a little look at sparkling diamond dust....amazing!!


Few days back I designed a card with flowers  for friendship swap using picked raspberry,victorian valvet and vintage photo distress inks. I used perfect pearls on the edges of the petals.


I made these with Joy craft flower die. You can make the same using any retro punch with three different sizes.I have used dried marigold and aged mahogany.


just a little difference in assembling...and you get a new look of the flower.


Again joy craft flower die and picked raspbarry distress ink


Both my very favorites....wild honey distress ink and Sunflowers. This is my first try on sunflowers with a punch and paper crumble technique. I have used punch bunch mega lily petals.


I made three different sizes.


I tried using my flowers on money envelops. I have not assembled them as yet but loved the effects. Have a look.


You must be wondering what paper i have used to make these amazing flowers.Earlier i was using fabriano brusto....but this time i tried with local card stock (Neelgagan)...and to my surprise it worked better then fabriano. Actually neelgagan card stock is bit slippery..and when i misted it with water extra water got slipped and soaked the amount which was actually needed to break the fibers. It was very convenient to crush this paper..... Not even got torn once. I have worked with these two papers only...but i think any paper ,120 to 180 gsm will work well.


So...did you saw how amazing these inks are. Some times I just need a touch of a particular shade and sometimes huge backgrounds are colored with variety of shades.

Are you worried about finishing them...???
Don't worry....these will work for long :)

Re-inkers are available for these ink pads, so there is no need to worry about using up all the ink. It will probably take you quite a long time before you need to re-ink them, even if you use them frequently. I use mine often, and have had them for a year, and I have not yet needed to refresh the ink except vintage photo. 
Moreover, The Craft Shop is just a mail away. You can find the complete range of distress inks in our store.


 That's all for today :)
 Hoping to see you soon with few more inspirations of using distress inks with water.
 
If you like my colorful posts...do leave some love.

(HUGS)

Rajni Chawla
(Passionately Curious)

Wednesday 11 September 2013

Emboss Resist using Distress Inks

Hey guys,

This is Khushboo this side with my turn to showcase something with distress inks... I am new to the whole world of distressing and still taking baby steps in picking up tricks.. There is just so much one can do with these small ink pads which last forever... For some gorgeous inspiration you can check the previous words by the DT which is really inspiring and knowledgeable..

Now onto my turn.. There are a lot of things one can do with distress inks and I am concentrating on resist embossing.. Now, resist embossing can be done with a lot of ways, embossing powders, UTEE, glossy accents, acrylic paints, crayons, etc.. the list is quite exhaustive.. I have used my embossing powders to create a background for a card using the resist technique.. This technique can be used to create varied backgrounds with some really cool results..

Step 1: cut your card stock to size and distress it with different colors of inks. I used the brustro water color paper for distressing as it gives a very vibrant finish to my inks..


Step 2: I inked a script stamp and stamped onto the distressed card stock. then using my Versamark ink and clear embossing powder I created a flowery background


can you see the clear embossing powder???

Step 3: use your heating tool to melt the embossing powder.. My heat gun has died on me so I used a griddle..


Step 4: use a dark color distress ink to cover the entire area of the card stock.. The areas which have been clear embossed will resist ink


Step 5: Now use it as you wish.. I made a card using it..


Heat embossed the sentiment on vellum using gold embossing powder...

Products used:-
Distress inks=> dusty concord, spiced marmalade, peeled paint, broken china, walnut stain, vintage photo, wild honey.
Versamark ink pad
Clear embossing powder, ranger golden embossing powder.
Penny Black Petal Party and MFT pearls of Wisdom

Join us for the current challenge at color conceptions. You can check the details here.

Hugs,
Khush

Sunday 8 September 2013

Coloring with Distress Inks

Hello Lovely Ladies,

This month we are focusing on the magical Tim Holtz’s Distress Inks. Yes I will call them magical inks. I got my first sets of these ink pads about two months back only and I am already loving them so so much. These inks can be used for stamping, embossing, coloring..etc. Our DT team will be revealing it’s techniques and uses throughout this month. If you missed our DT Rajni Chawla's superb post on distress inks, do checkout here.

I love to add images in my projects. And hence I color them. I really tried hard earlier to get the perfect results with watercolor pencils but was never satisfied with some areas like hairs, face, skin. Now I have started coloring my stamped images with distress inks and yes I got what I wanted -  intense colors with very good blending and of course finished it in much lesser time. This is the image which I colored with distress inks. Check out my complete card here.


So today I will be sharing some tips and steps on how to use distress inks to color images. You should gather these basic materials -
  1. Distress inks - Colors of your choice
  2. Watercolor paper - Take a heavy weight watercolor paper for stamping to avoid tearing while working with water n inks.
  3. Waterproof  ink - Use permanent archival ink to stamp your image. I have used ColorBox Archival ink. Ranger's Versafine or Stazon can also be used.
  4. Acrylic Block or Craft Sheet 
  5. WaterBrush - I am using Sakura Koi Waterbrush
  6. Tissues
  7. Heat gun or Dryer (optional) - Can be used to dry the paper in between.
Before going further I would like to share some info about water brush and why it is required.

The portable Sakura Koi Waterbrush comes in two separate pieces that screw together. The barrel holds water and has a small cap. Don't throw it away !


How Koi Brush works?
    When you squeeze the barrel, water enters the nylon bristles, thus eliminating the need for a separate water container. It also makes cleaning the brush between colors a breeze. 
     Best thing about waterbrushes is that the constant water supply will allow you to go from dark to light in a natural unbroken graduation.You can start your stroke where you want the color to be the darkest and most saturated, and work your way to the lighter, less saturated areas.If you stay with the stroke long enough, it will go all the way to pure water. You can utilize this unique feature to get some great effects. 

Ok enough talk about the brush, lets begin coloring 

Rules which I always follow while coloring, which may vary from person to person
(i) Choose at least one light and a dark shade of a color to add depth
(ii) Go from light to dark shade and color from outside to inside of area you are coloring
(iii) Leave few areas for highlights.
(iv) Always apply a light coat of color first. You can make it darker later on but not vice versa. 

Hairs 

Step 1 : Stamp your favorite image using archival ink on watercolor paper. I am using cute and naughty "Odd Girl Stamp Artist Mae "available at The Craft Shop. Check the complete range here.
Step 2 : I always begin with hair coloring which according to me is the most difficult part. Choose the ink pads you like.I am doing brown hairs so I chose - Vintage Photo and Walnut Stain. Tap a small amount vintage photo directly on acrylic block and dilute it. A very small is sufficient
.

Take your waterbrush and ink it up and apply strokes on image leaving areas for highlights


Apply second coat of vintage photo but this time shorten the length of the strokes


Now take walnut stain.Use tissue to clean brush and acrylic block before taking next color. For darker shades I prefer to pick color directly from the ink pad. Apply shorter strokes.


Face

Step 3 : Next color the face. Again take diluted vintage photo and apply on the outer edge


Dilute it more and apply on rest of the facial area leaving a small portion for highlighting. .Make sure to blend it well with the outline.Here you will know how important it is to use a waterbrush. You can also use other colors like tattered rose, worn lipstick, antique linen or their combinations.


Color rest of the skin in the same manner


Sharing pics of rest of the parts. I think they are self explanatory


Finished Artist Mae


One more 
Hairs - vintage photo
Skin - worn lipstick and vintage photo


I have also colored other stamped image using Distress Inks. Take a look 
Mustard Seed, Spiced Marmalade, Vintage Photo

Picked Raspberry, Fired Brick, Worn Lipstick


One stamp in four different ways
Mowed Lawn, Shabby Shutters, Mustard Seed, Vintage Photo

Picked Raspberry, Fired Brick, Worn Lipstick,
Mowed Lawn, Shabby Shutters, Mustard Seed, Vintage Photo

Fired Brick, Picked Raspberry, Vintage Photo, Worn Lipstick
Don't restrict yourself to coloring stamped images only. Try coloring mulberry roses and other flowers also.

Spiced Marmalade, Broken China

Try coloring diecuts specially intricate diecuts. I have ruined few of my diecuts with blender tool. Waterbrush is the safest tool to do so.
IO Love Birds Die

Ending my lengthy post here. Hope I have inspired you a bit. Do drop a comment. We would love to hear from you and will be back with more doses of ideas on distress inks. N don't forgot to participate in our current challenge "Spread Your Wings with Distress Inks". Till then

Have Fun Crafting
Poornima


Copyright © 2015 The Craft Shop
| Distributed By Gooyaabi Templates