Brayer Techniques
Hello!!
This is Tanvi here, with my inspiration for this month's theme - Spread your wings with distress inks.
My team feels extremely satisfied to see you all inspired by our posts..............................this in turn inspires us to bring the best in every post !! The blog has already crossed 100 followers so stay tuned for some announcements coming your way.
Now onto today's post which is all about brayers & these are now available at THE CRAFT SHOP & so are all the supplies used here at very economical rates.
BRAYER is a type of roller that can be used as an ink applicator to spread the ink evenly across a large surface.
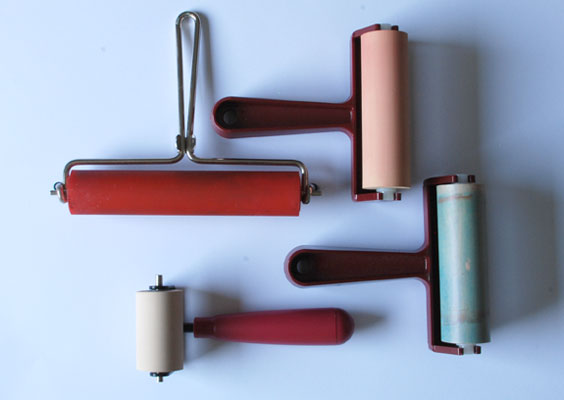
Google image
It has a handle and interchangable rollers. A soft rubber brayer is the best type to use with inkpads.
TYPES OF INKPADS
Any type of inkpad can be used, best results are with water based dye inks. Stunning backgrounds can be created with rainbow inkpads in a jiffy.
TYPE OF PAPER
For best results use glossy card stock. But remember the color will look darker initially & fades as the ink dries.
USING THE BRAYER
1. Roll the brayer over a stamp pad in one direction, lift and roll again in the same direction. Repeat until the roller is fully inked. Do not roll back and forth on the pad - this results in inking only a part of the surface.
2. After the brayer is inked, roll it on the paper or card. Roll the brayer back and forth, lift & repeat over your project & change the direction so that the colors blend, re-ink as required.
CLEANING
The brayer can be easily cleaned by rinsing it under running water and wiping dry with a paper towel. Stubborn stains will require alcohol or stamp cleaners.
TECHNIQUES
- The background you see here is created with distress inks. Load the ink pad with mustard seed as described above - ROLL & LIFT & ROLL followed by step 2. After you are satisfied use the other color over this - spiced marmalade.The lower part of the tag was masked with a torn paper & later I used peeled paint & mowed lawn. Once the BG is ready use stamps of your choice.

2. This is a resist technique also referred to as ghosting, with versmark ink. Stamp the image, do not heat emboss but ink the brayer & roll over it. Observe the stamped image appear like magic as the brayer spreads the ink! 3. The next tag is created with a technique called Josephs Coat - this is essentially the same technique as above with an additional step of first coating the card stock in a bright colored ink (picked rasberry) & then stamping the image in versamark (the image can then be heat embossed in clear powder). Load the brayer in black soot & layer over the stamped image. Use a dry tissue to wipe off the excess top coat & voila, see the hidden image brighter & sharper.


4. Look at these amazing effects obtained by rolling a brayer over dry embossed card stock.

Another tag which is embossed but this time I loaded the brayer with glitter glue & then rolled it over the embossed surface.

A closer look at the glittery sparkly result. I love this!!

5. Another interesting use of the brayer is to create interesting backgrounds like this one, can you guess what I have used here????

Yes tied a number of rubber bands on the brayer & roll it over as you please. One can try using bubble wrap, cheese cloth, mesh, lace, burlap, tulle or you can even use markers to draw patterns on the brayer & then transfer on the cardstock.
6. And finally a very interesting technique - mirror imaging / reflection. This allows to stamp a reverse image & create interesting a reflection of the image.
These are the supplies you will need.

Ink your stamp & use a clean brayer to roll over the inked image, this will tranfer the image on the brayer as shown below.

Next roll the brayer on the cardstock I have done it at the bottom to obtain a reverse image which as desired will be lighter as it is the reflection. TIP - Stamp the reflection first so that it is easier to position the actual image later.

Ink the stamp once again & carefully position it & stamp..........there you have a mirror image. This technique is often used to create landscapes along a water body to show reflection in water.

So you can see the brayer can be used to create numerous backgrounds & textures for your creative projects. Use a single color for a solid BG or many colors for a multicolored BG. Remember you need a bit of practice using this versatile tool but once you nail the technique sky is the limit & you can make your own unique BGs.
Thank you for joining me today & do participate in our challenge this month. Awaiting your feedback!!!!


.jpg)


Thanks a lot for the post!!
ReplyDeleteI had all the while been wondering what these are used for...
Superb tips.. Thanks a lot for sharing these techniques.
ReplyDeleteTanvi... Thanks a million for showing such magnificent uses with bracers.. Made me fall in love with mine all over again ;-)
ReplyDeleteAmazing post Tanvi....i hv just tried few....but got lots to learn from thys post of urs.
ReplyDeletethanks :)
Thx Rajni.............this is the best part learning along with each other!!!
DeleteVery informative post..tanvi thanks for sharing.....definitely going to try..must say effects are amazing. ...
ReplyDeleteLots of new ideas!! Each one Brilliant!! Thanks for sharing these info Tanvi!
ReplyDeletethanks for all the tips
ReplyDeletethank u tanvi
ReplyDelete