Decoupage Tutorial with our GD - Anita Kejriwal!!
Hiya Crafters,
Priya here to introduce our Guest Designer for this month. Since our Challenge this month is Anything but a Card., we should be showing something different. And this art is so popular these days, more and more people want to learn. So we decided to make a tutorial! And when the topic was decided as Decoupage, who else can be a better coach than our fellow crafter
Anita Kejriwal!!
She has always stolen our hearts with her works - be it cards, scrapbooks, 3D projects, Sospeso or Decoupage!. This lady has immense stock of her talent inventory.They are noticed and appreciated. But there is so much more to be exposed ;). Here she goes with her decoupage pictorial,,
Hello friends
I hope you all are keeping yourself busy with crafting et al and enjoying the summer heat. Well I'm certainly enjoying myself and here is a post that will prove it.
I'm really happy to do a GD post for my most favourite fellow crafter-Priya Sivaraj ..the owner of the most popular online craft store-The craft shop. This is a store that has grown up in leaps and bounds and now stocks hundreds of products from best brands. Not only that, a plus point about Priya's store is the price factor of the goods that attracts the buyers and above all the impeccable courier service...I vouch for it ,,ITS THE BEST !!! In fact , its so good that at times, I feel she owns a private jet through which she sends our stuff within 24 hours ... lollll.
So here is a tutorial on something that is a favourite amongst many crafters and gives a complete new look to any household item.. You guessed it right... Decoupage
This also matches up to the current challenge at the color conceptions blog--Anything but a Card. So if you still have not played along the challenge, this is the tutorial for you.
Decoupage can be done in many ways using fabric, tissues, paper etc. The material you work upon can vary from metal, wood, plastic, fabric, leather and glass. So its a very versatile form of art and what I bring before you is very simple decoupage ,,something that can be done in few hours and with most common products.
The craft shop houses all the raw materials needed for decoupage. So once you go through my post, just hop to the shop and start your D shopping.
Here is my project... So lets begin.

supplies that you need are:
The object for decoupage--I,ve taken a MDF tissue box
Gesso or water based primer paint-available in paint shops
acrylic colours
foam brushes
tissue napkins
decoupage glue or Mod Podge--I've used the latter.
hair dryer or heat gun
sponge
craft mat
rubber stamps of your choice, die cuts, flowers and pearls etc for decoration
step 1
It is important to prepare your object by painting it with a single or double coat of gesso or primer to seal all the pores and give a smooth look to the surface. You can use a foam brush or any flat brush for this purpose, if the gesso is thick, thin it with a little water. You can leave it to air dry or speed up the drying with a hair dryer or heat gun. If you want a smoother surface, just rub the entire box with a wet sand paper, wipe clean and repeat the process.

Step 2
Now select the tissue napkins according to the design that you want. Here I have coordinated two napkins.
 Step 3
Decide how you want to place the design on your tissue box and then cut with the scissors.

Step 4.
Remove the two ply of the napkin. With a foam brush, apply a smooth coat of mod podge and then dry using the dryer. Place the design and smoothen out the wrinkles by pressing it well with wet sponge. Again dry it. Continue like this till all the cut designs are pasted on the box.


Step-5
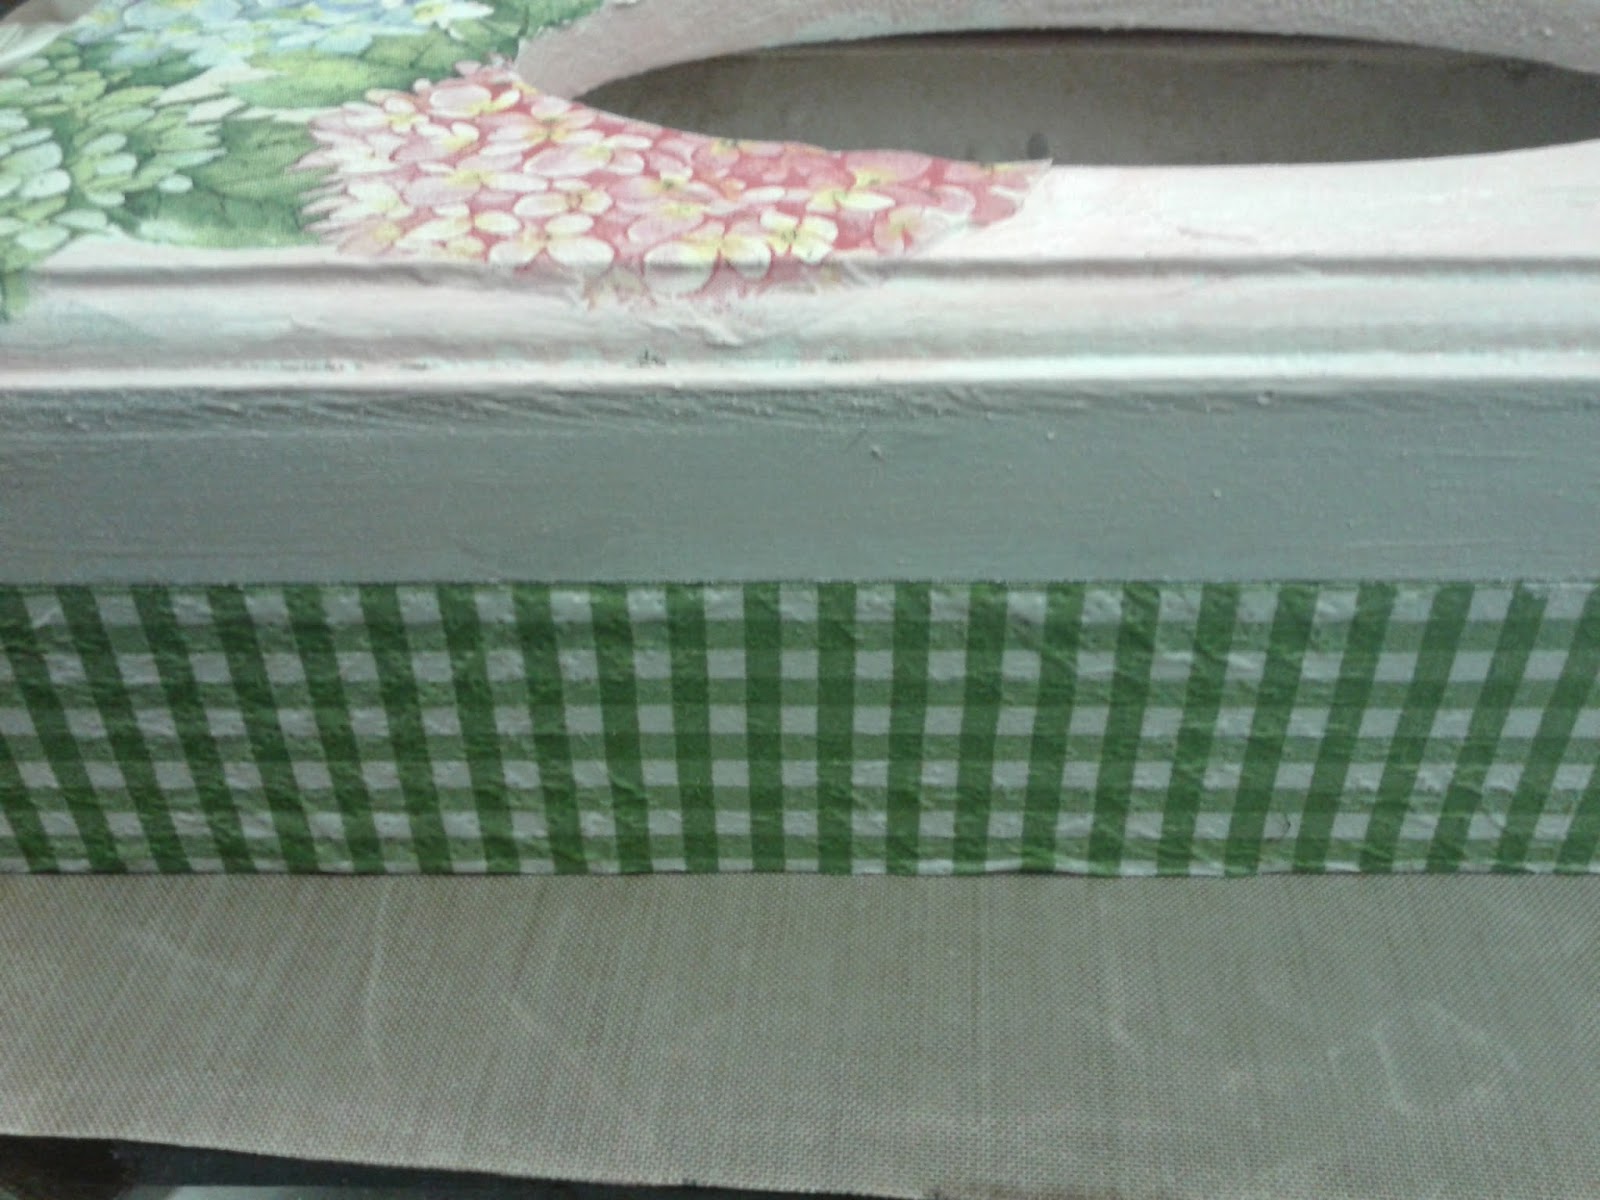
Now with acrylic colours, paint the areas that have not been covered with napkin, with the colour matching the napkin design. In this case, I painted the top of the box with very light pink color.

Step 6
Now apply a thin coat of mod podge all over the box once again, all over the tissue also, as Mod Podge acts as a sealant. Dry it well.
Step 7
Now you can decorate the box as you please, with die cuts, punched laces, pearls, flowers etc etc.

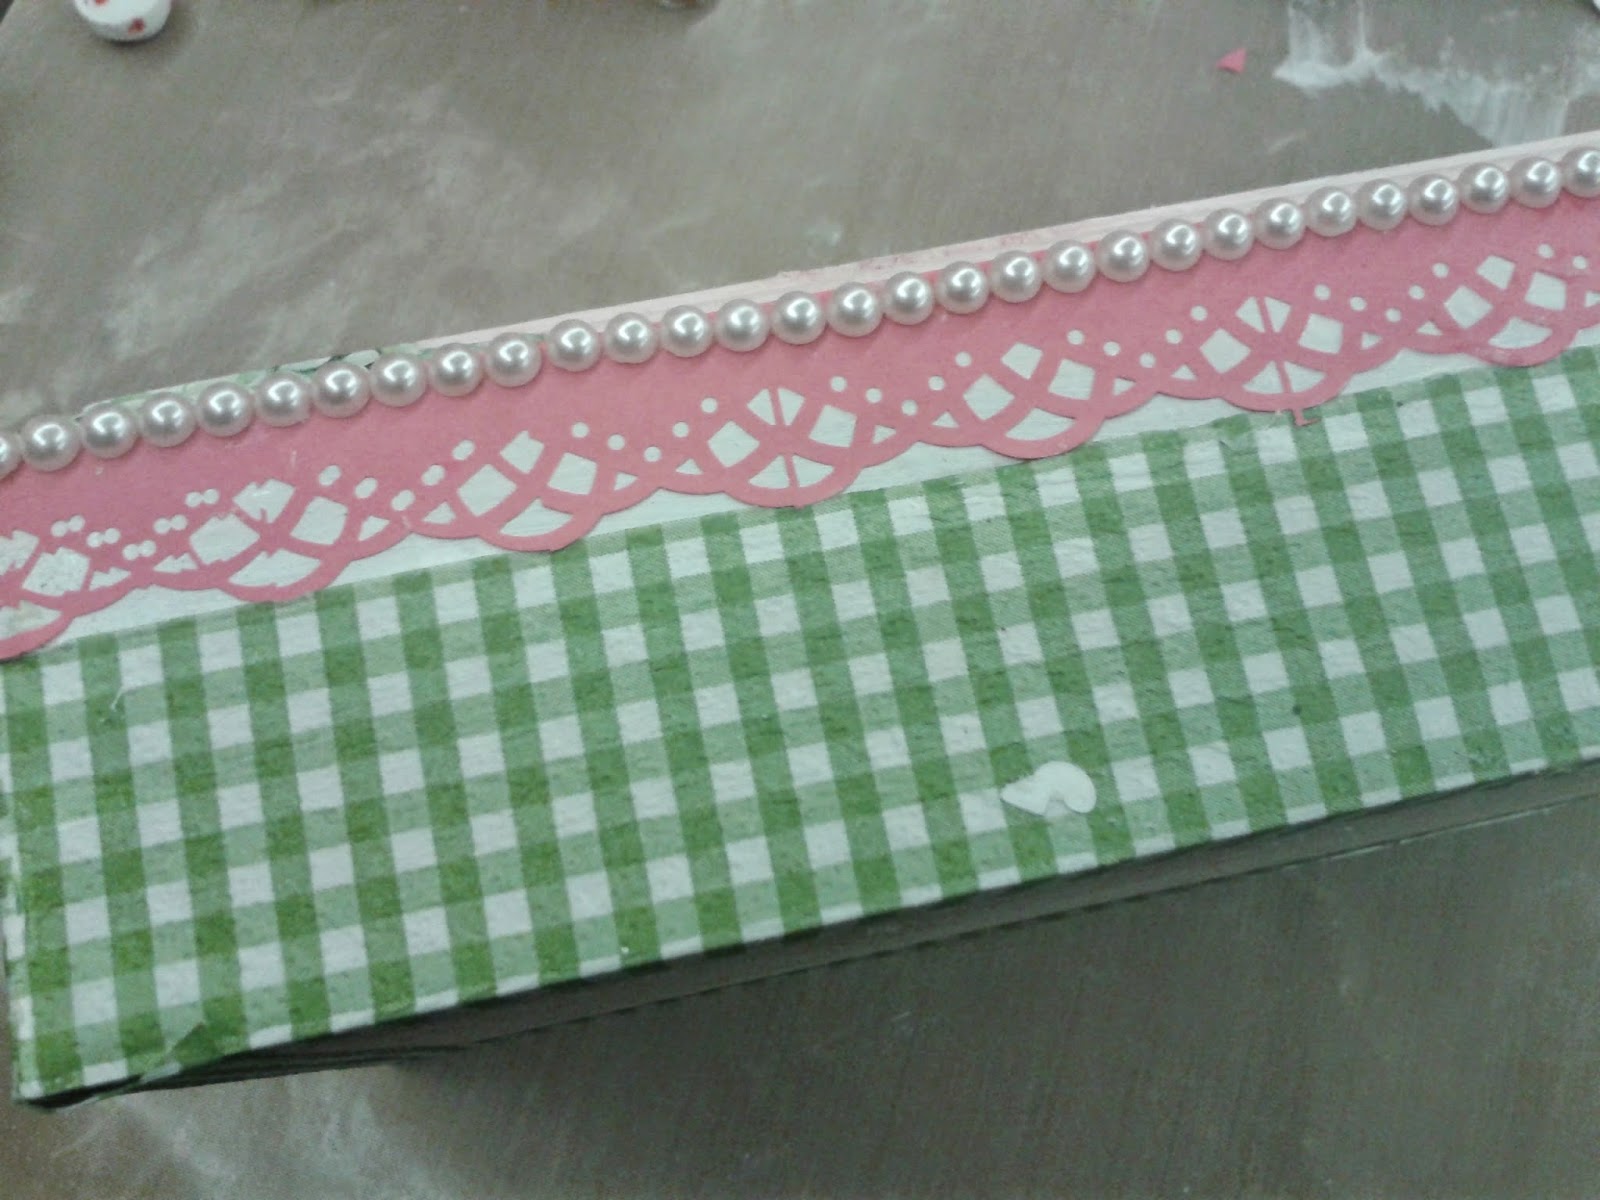
The complete project looks like this.


I hope, I've explained all the steps clearly. If you feel anything missing or need to know anything, just feel free to ask me at anitakejriwal@hotmail.com. I'm waiting to see what everyones comes up to me. Also, I would like to point out that Decoupage is a long process and this is just a simplified version : something that involves little labour but gives great results.
Do leave your comments. Thanks a lot for the love and appreciation you all keep showering upon me. Stay tuned with craftingforever-anita.blogspot.in.
Till then...HAPPY CRAFTING.
Thank you so much for the store complement Anita! We are glad, we could serve you all!!
Many Many thanks for being our GD this month! You project as usual is an eye candy :)
So ppl, wat r u waiting for? You can enter anything in the challenge, other than cards.Do participate.
Thanks for stopping by!
Priya
Priya here to introduce our Guest Designer for this month. Since our Challenge this month is Anything but a Card., we should be showing something different. And this art is so popular these days, more and more people want to learn. So we decided to make a tutorial! And when the topic was decided as Decoupage, who else can be a better coach than our fellow crafter
Anita Kejriwal!!
She has always stolen our hearts with her works - be it cards, scrapbooks, 3D projects, Sospeso or Decoupage!. This lady has immense stock of her talent inventory.They are noticed and appreciated. But there is so much more to be exposed ;). Here she goes with her decoupage pictorial,,
Hello friends
I hope you all are keeping yourself busy with crafting et al and enjoying the summer heat. Well I'm certainly enjoying myself and here is a post that will prove it.
I'm really happy to do a GD post for my most favourite fellow crafter-Priya Sivaraj ..the owner of the most popular online craft store-The craft shop. This is a store that has grown up in leaps and bounds and now stocks hundreds of products from best brands. Not only that, a plus point about Priya's store is the price factor of the goods that attracts the buyers and above all the impeccable courier service...I vouch for it ,,ITS THE BEST !!! In fact , its so good that at times, I feel she owns a private jet through which she sends our stuff within 24 hours ... lollll.
So here is a tutorial on something that is a favourite amongst many crafters and gives a complete new look to any household item.. You guessed it right... Decoupage
This also matches up to the current challenge at the color conceptions blog--Anything but a Card. So if you still have not played along the challenge, this is the tutorial for you.
Decoupage can be done in many ways using fabric, tissues, paper etc. The material you work upon can vary from metal, wood, plastic, fabric, leather and glass. So its a very versatile form of art and what I bring before you is very simple decoupage ,,something that can be done in few hours and with most common products.
The craft shop houses all the raw materials needed for decoupage. So once you go through my post, just hop to the shop and start your D shopping.
Here is my project... So lets begin.
supplies that you need are:
The object for decoupage--I,ve taken a MDF tissue box
Gesso or water based primer paint-available in paint shops
acrylic colours
foam brushes
tissue napkins
decoupage glue or Mod Podge--I've used the latter.
hair dryer or heat gun
sponge
craft mat
rubber stamps of your choice, die cuts, flowers and pearls etc for decoration
step 1
It is important to prepare your object by painting it with a single or double coat of gesso or primer to seal all the pores and give a smooth look to the surface. You can use a foam brush or any flat brush for this purpose, if the gesso is thick, thin it with a little water. You can leave it to air dry or speed up the drying with a hair dryer or heat gun. If you want a smoother surface, just rub the entire box with a wet sand paper, wipe clean and repeat the process.
Step 2
Now select the tissue napkins according to the design that you want. Here I have coordinated two napkins.
Decide how you want to place the design on your tissue box and then cut with the scissors.
Step 4.
Remove the two ply of the napkin. With a foam brush, apply a smooth coat of mod podge and then dry using the dryer. Place the design and smoothen out the wrinkles by pressing it well with wet sponge. Again dry it. Continue like this till all the cut designs are pasted on the box.
Step-5
Now with acrylic colours, paint the areas that have not been covered with napkin, with the colour matching the napkin design. In this case, I painted the top of the box with very light pink color.
Step 6
Now apply a thin coat of mod podge all over the box once again, all over the tissue also, as Mod Podge acts as a sealant. Dry it well.
Step 7
Now you can decorate the box as you please, with die cuts, punched laces, pearls, flowers etc etc.
The complete project looks like this.
I hope, I've explained all the steps clearly. If you feel anything missing or need to know anything, just feel free to ask me at anitakejriwal@hotmail.com. I'm waiting to see what everyones comes up to me. Also, I would like to point out that Decoupage is a long process and this is just a simplified version : something that involves little labour but gives great results.
Do leave your comments. Thanks a lot for the love and appreciation you all keep showering upon me. Stay tuned with craftingforever-anita.blogspot.in.
Till then...HAPPY CRAFTING.
Thank you so much for the store complement Anita! We are glad, we could serve you all!!
Many Many thanks for being our GD this month! You project as usual is an eye candy :)
So ppl, wat r u waiting for? You can enter anything in the challenge, other than cards.Do participate.
Thanks for stopping by!
Priya


.jpg)


Such a fabulous make-over. Thanks for this tutorial, Anita. You really made decoupage so easy to understand. And I agree with you, 'The craft shop' is one of the best online craft shops.
ReplyDeleteAwesome tute, Anita. Yeah, I'm of the same opinion as you and Jasleen. Shopped from The Craft Shop recently and it was THE most hassle free and quick experience ever!
ReplyDeleteLovely creation!!! Cant wait to make one myself too.
ReplyDeleteThanks for the tutorial. The box has completely transformed. Its beautifuuuul!!
ReplyDeleteVery nice.. thnks for the tutorial. I want to ask frm step 4.firstly Mod podge was applied on napkin or on box? Thnks
ReplyDeleteModpodge was applied on the box, then dried, then the napkin was placed and dried and then another coat of mod lodge was given. I hope this helps.
DeleteThanks Monica, mod podge should be applied on the box and then the napkin should be placed. Then a final coating of mod podge should be given.
DeleteHi Anita,
ReplyDeleteThanks for the great tutorial. I have fallen head over heels for decoupage and this tutorial has come just at the right time. I wanted to know if the craft is possible with gift wrap papers as well coz i m unable to lay my hands on good patterened tissues.
Yes, nidhi,,mod podge is very versatile. You can use paper, fabric anything.
DeleteWow...u explained every thing in a simple way. Love it and will surely try it. I have gloss mod podge can I use it do tell me and also tell me which acrylic colours to use . Thanx
ReplyDeleteHi thanks, you can use gloss as the last coat to give a shine to your project. You can use calming or fevicryl but use tube colours
DeleteSorry camlin
DeleteHi Anita,
ReplyDeleteThanks for the great tutorial. I have fallen head over heels for decoupage and this tutorial has come just at the right time. I wanted to know if the craft is possible with gift wrap papers as well coz i m unable to lay my hands on good patterened tissues.
Oh woww...thanks anitadi for sharing this ,inspired to try this now for sure ....looks so good ....
ReplyDeleteThe box looks adorable Anita. I am surely gonna try this.... thanks for the wonderful inspiration!
ReplyDeleteWhat a gorgeous box !! Loved the tutorial,Thanks for sharing !
ReplyDeleteThanks everyone.
ReplyDeleteUr project looks amazing. And d tutorial is tempting me to try decoupage too :)
ReplyDeleteWow Anita, what a simplified tutorial.... I still have few queries...
ReplyDelete1. Can I use camle texture white instead of camel gesso?
2. As per step 4, first u apply mod podge all over and let it dry.... Then place the design and remove the creases with wet sponge. But if the mod podge is dry how will the design stick on it????
Wht u told abt the craft shop is very true. Priya was a saviour in my case when I urgently needed few punches.... Within 24 hours they were in my hand... And at a super grt rate....
Thanks!!!!
Dear Giftarts
DeleteStep 2 dry means let the mod podge dry a little bit instead of putting the paper or fabric on a totally wet layer of adhesive. U make fan the area for say sum 45 seconds or leave it for 1.5 - 2 mins. It will help avoid wrinkels. Happy crafting.
You should use gesso and not texture white . Once you press with wet sponge.. the stickiness is back or if you are careful.you can put the tissue when the glue is wet. Even that is possible.
ReplyDelete