DIY Washi Tape Embellishments and Cake Toppers
Hello Lovely People,
This month we are featuring the famous Washi Tapes. The tapes are really irresistible specially when the prices are so economic as in Craft Shop. Once you start using it, you will always want to have more in your stash. I think for making quick projects nothing beats Washi Tapes. You must have seen awesome inspirations from our DTs and Guest Designer. And today I will showcase the use of washi tapes in making embellishments and cake toppers. Before that, I want to share a recycled sweet box. Here’s the recycled box-

The tile pattern on the top is made using two washi tapes. I love to add ruffled ribbons in my project but always struggled making them. But you know what, this is now the most easiest thing I have ever done. Thanks to Washi !! Lets see how I made it -
Take a piece of ribbon ( mine is satin ) and Washi Tape. Adhere washi to the entire length of the ribbon.

Start pleating it and continue doing it till you reaches the end.


Oh wow look at final result. Since washi tapes are reusable you can use this ruffled ribbon on any other project.

Washi Tape Flower Embellishment -
Washi Tapes can be used to make pretty flower embellishment. This is one I made and used on my recycled matchbox. Complete picture here.This flower came out when I was experimenting with these cute washi tapes as part of my DT project. And I thought to share a tutorial with you all. Below is the tutorial on how it can be made.

Take a piece of a washi tape and fold it as shown. Length depends how big you want your flower to be.I have taken 2" tape. It will end up in a large flower. The one that I used on matchbox is smaller.

Find the centre and fold half part

Fold the remaining half too.


Make four such petals

Punch out a circle and stick all four petals
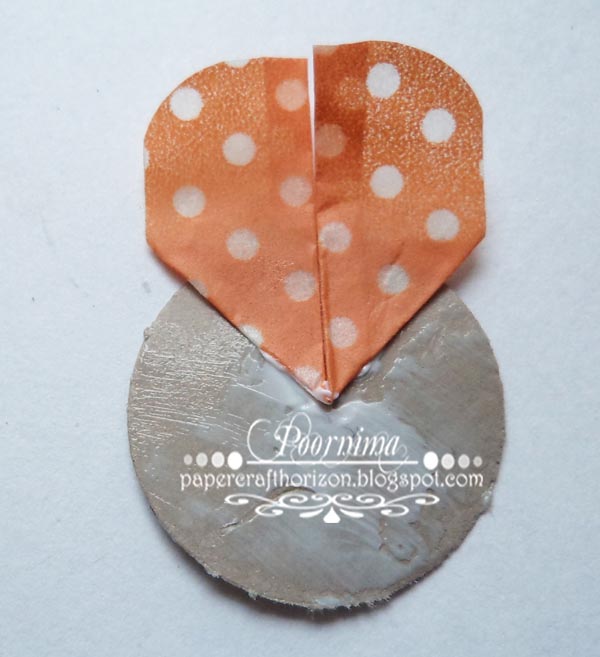
Now give slits in cardstock with scissor so that you can lift up the petals. This is optional

This picture shows how backside will look after giving slits

Embellish the center. Here's my flower -

Washi Tape Cake Toppers -
(1)Toppers for Children Parties - I have tried some super cute cake toppers which are so quick and easy to make. These are perfect for kids parties.
Die cut or punch our a circle. Add about 1" washi tape on both sides of circle to make ears.

Give a round shape using your scissor


Cut a piece of about 11/4" washi tape and stick it the circle with a toothpick in center

Add hands and legs

Add another piece of washi over toothpick

To make trunk, cut a piece of tape and fold it lengthwise leaving a small portion at the top.

Stick the trunk on the face as shown. Add eyes to complete it.

These are finished ones-

Added a small washi tape bow in it

(2) Washi Tape Flag Topper-
Take a piece 4" of Washi Tape. Stick a piece of wire on sticky side of tape from center.

Fold it over -


Now shape the flag as you like


(3) Washi Tape Rosette -
Take a piece of 8" by 0.5 " paper. Add your favorite washi.

Score at every 1/4" interval


Join the two ends. Punch out 1" circle and adhere rosette to it. You can use it as embellishment for cards or add a toothpick to make it a cake topper.

Tip - You can use border punch on outer edge before scoring to add some cool design.
Finished one-

Hope you like these washi tape tutorial. Would love to hear from you. And don't forget to participate in our current challenge -"Trash to Treasure using Washi Tapes". Hurry up , just few days left. Till then,
Have Fun Crafting !!
Poornima


.jpg)


Fabulous ideas Poornima!...I really love the way you have done the flowers,the cake toppers and the rosettes..They look so cute and pretty! :)
ReplyDeleteThank you so much for sharing !
cute ideas....
ReplyDeleteLovely ideas Poornima ! I liked the ruffled ribbon n the cute toppers.
ReplyDeleteAwesome ideas. ove the cup cake toppers, all kids would love these.
ReplyDeletePoornima!! those are super awesome ideas!! Thanks for sharing :)
ReplyDeleteAmazing ideas Poornima!! Love the flowers, toppers, ruffles and rosette!
ReplyDeleteawesome ideas poornima... its soooo beautiful..
ReplyDelete